Create Campaign
You create campaigns in the Campaign Wizard.
Select Create Campaign.
You will see Step 1 in the Campaign Wizard.
Depending on how the platform is setup you will see different options. In this example you can select between Web, Mobile and TV.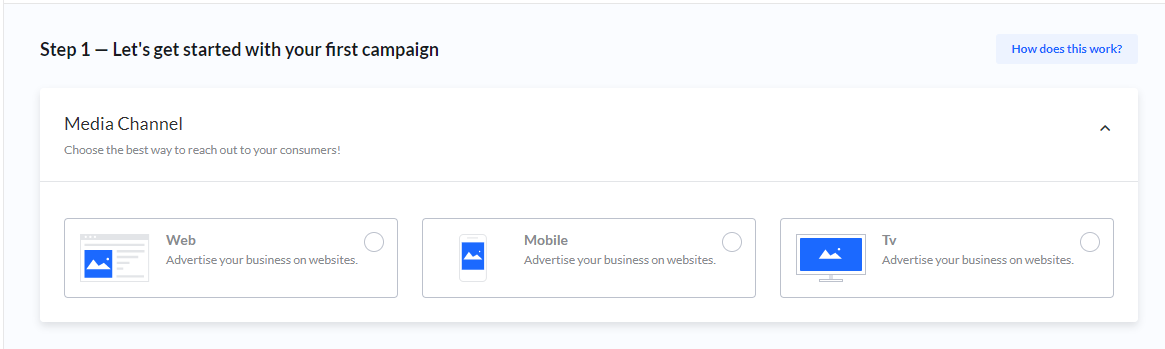
As you make your selections, new options are shown.
What you select will result in one or several products/placements which match the selections you made.
First products shown are Recommended.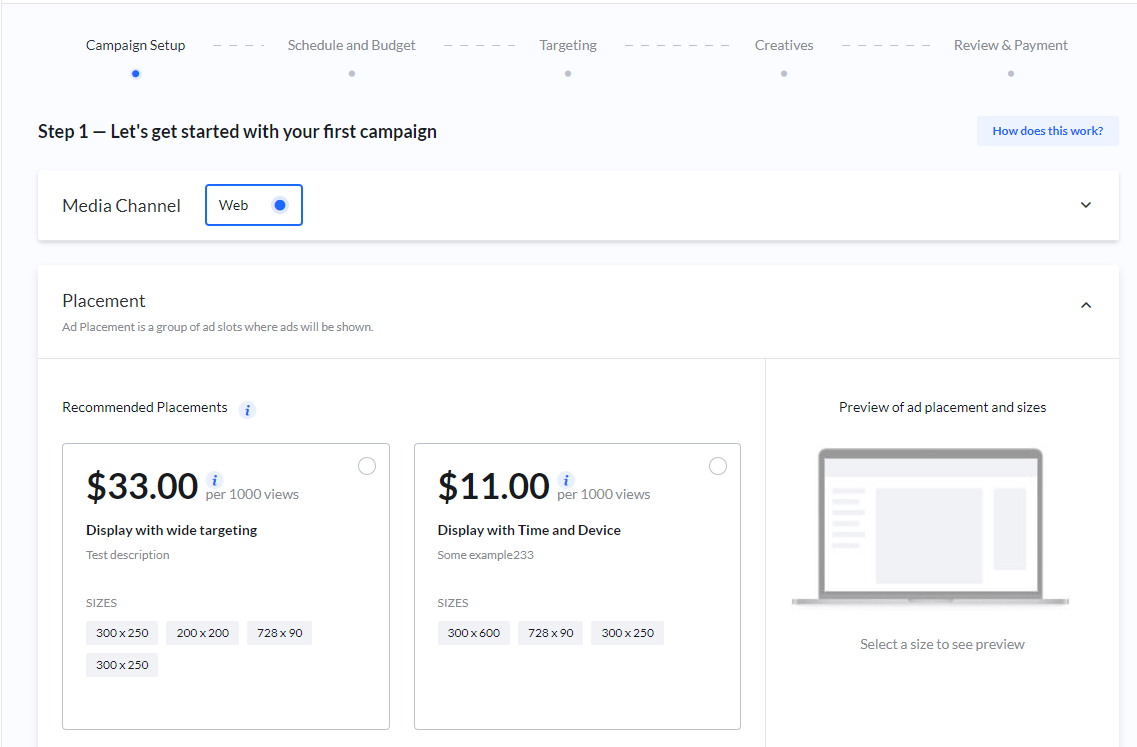
If you scroll down you can see all available products.
Select the product most relevant to you.
Pay attention to the price description. which can be one of the following:Price per day
You buy all (100%) or part of available ad impressions, for a limited number of days.
This price model is CPD (Cost-Per-Day) and the % is also known as SOV (Share-of-Voice).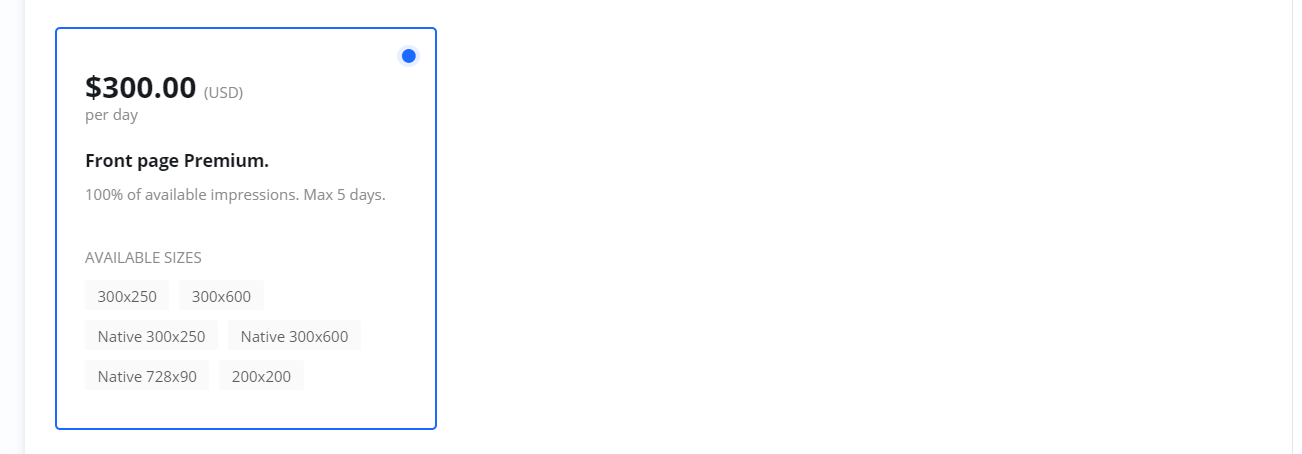
Price per click
You only pay when someone clicks on your ads. Price model is CPC (Cost-Per-Click).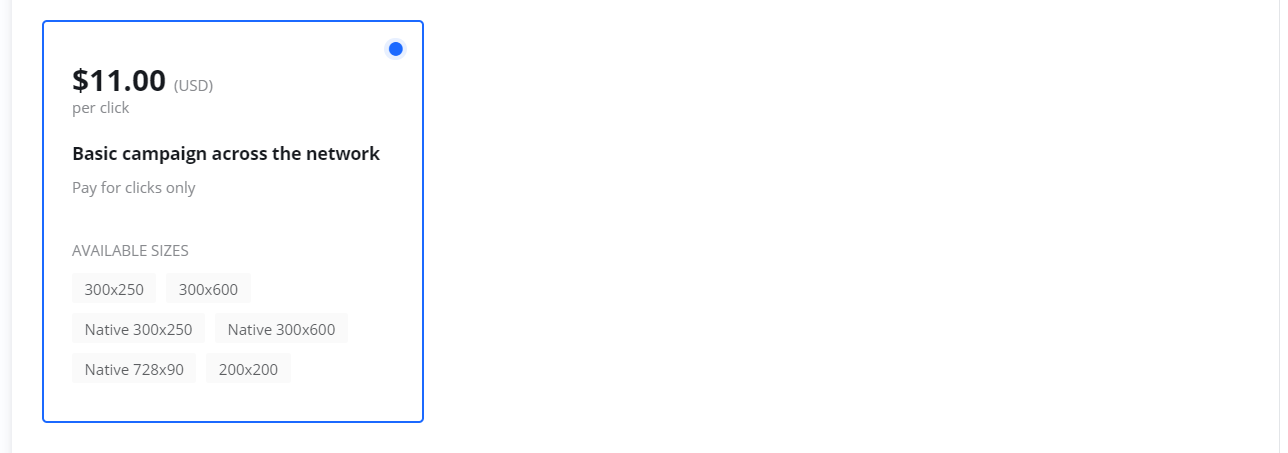
Price per 1000 impressions
Buy impressions when you want to reach as many viewers as possible. Price model is CPM (Cost-Per-Mille).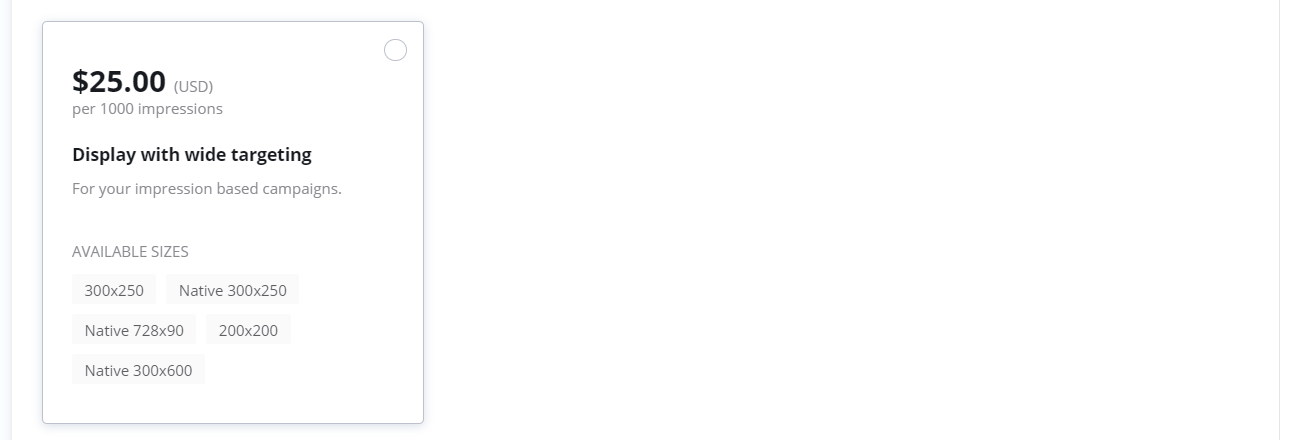
When you select a product you can preview the available sizes/ad-slots in the side panel.

To move forward in the wizard, click Next.
Schedule and budget
Schedule and Budget is often step 2 in the campaign wizard. Remember, depending on the product you selected, your options for each step might be different.
Budget model - options for how you wish to pay.
If available you can choose between Pre-pay or Subscription.
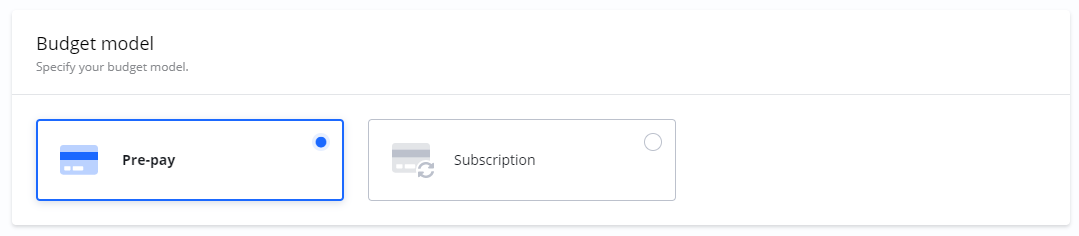
Pre-pay
Pre-pay means you will pay for your campaign upfront (or by invoice).
An example: If you set your campaign budget to $900, you will pay $900 upfront. In case the campaign does not deliver impressions or clicks for $900, you will receive a refund. You only pay for what was actually delivered.
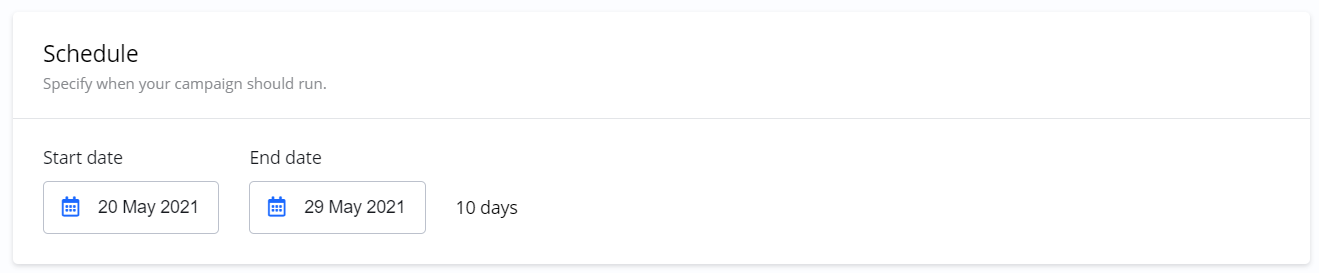
When you select Pre-pay you can set Start and End date.
Subscription
Subscription means you will pay for your campaign on a weekly schedule.
An example: When the campaign starts your card will be authorized the weekly budget. After seven days, the authorized amount is adjusted, and you pay for what was actually delivered. This cycle continues weekly until the end date or until you cancel your subscription.
For Subscription you set Start date and can choose between fixed or open End date.

Please note: Depending on the platform setup the Subscription budget model might not be available.
Budget
Depending on the Price and Budget models you choose, the options for Budget will be different.
Budget for impression based campaigns (CPM):
You can switch between setting budget in money or impressions.

Budget for impression based campaigns (CPM) - Subscription budget model:

Budget for click based campaigns (CPC):
You can switch between setting budget in money or clicks.

For click campaigns, and you wish to pay for delivered clicks as a subscription, you set the daily budget only:

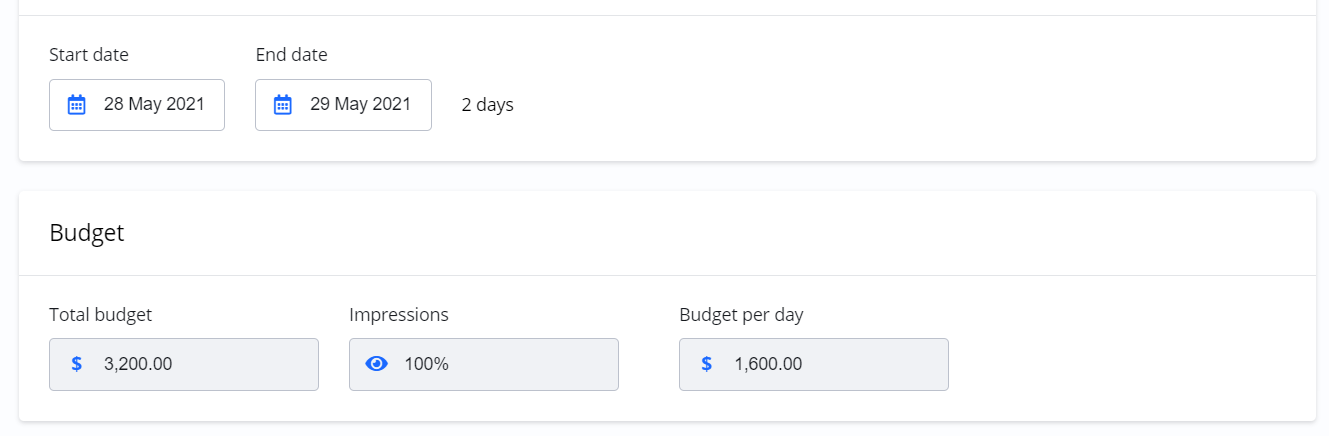
Budget for % (Share-of-Voice) based campaigns (CPD):
For campaigns where you buy a % of all available impressions, the number of days decides your budget. Here is an example of a CPD campaign with a price of $1,600 per day, running for two days.
Please note: For CPD campaigns there is often a limit on number of days you can run your campaign. If you select more days that the limit you will be notified.
Availability
Between each step the Platform is checking if the impressions you are looking for are available.
Campaigns are stored automatically at the Budget and Targeting steps in the wizard.
New campaigns are stored as DRAFT.
Targeting
Next step(s) when creating your campaigns is targeting. This is where you control where, when, to whom and how often your ads are shown. Remember, depending on the product you selected, your options for each step might be different.
After Schedule and Budget you click Next to get to the Targeting step.
Add-on prices for targeting
Some targeting options might have additional costs. You can identify these by a green $-icon next to the targeting name. For example here where Gender targeting has an add-on price.

Age and Gender
If available you can set Age and Gender targeting.

Note: Age and gender targeting limits your reach to audiences that are actually identified with age and gender. If you want to reach everyone, select All.
If you are using these targeting options, and you notice delivery of impressions is low, also consider setting these to All.
Time scheduling
Under Time scheduling you can set specific schedules if want your ad to be shown only on specific days of the week, and specific times during those days.

For example, here is a campaign scheduled to run only on Friday afternoons and weekends in the morning:

Frequency capping
Frequency capping is a setting which objective is to limit the times your ad is shown to the same user.

Browser type and Browser Language
You can set Browser type and Language, both optional.

Device category and Operating system
If available, you can select Device category and Operating system, both optional.

Geography
Select Geography if you want your ad to be shown only to audiences viewing your ad from specific locations.

Creatives
After targeting you can add you creatives. Creatives are your actual ads which will be shown to your audience.
You can + Add New Creative or skip this step and Add Creative later.
Read more about Creatives here.
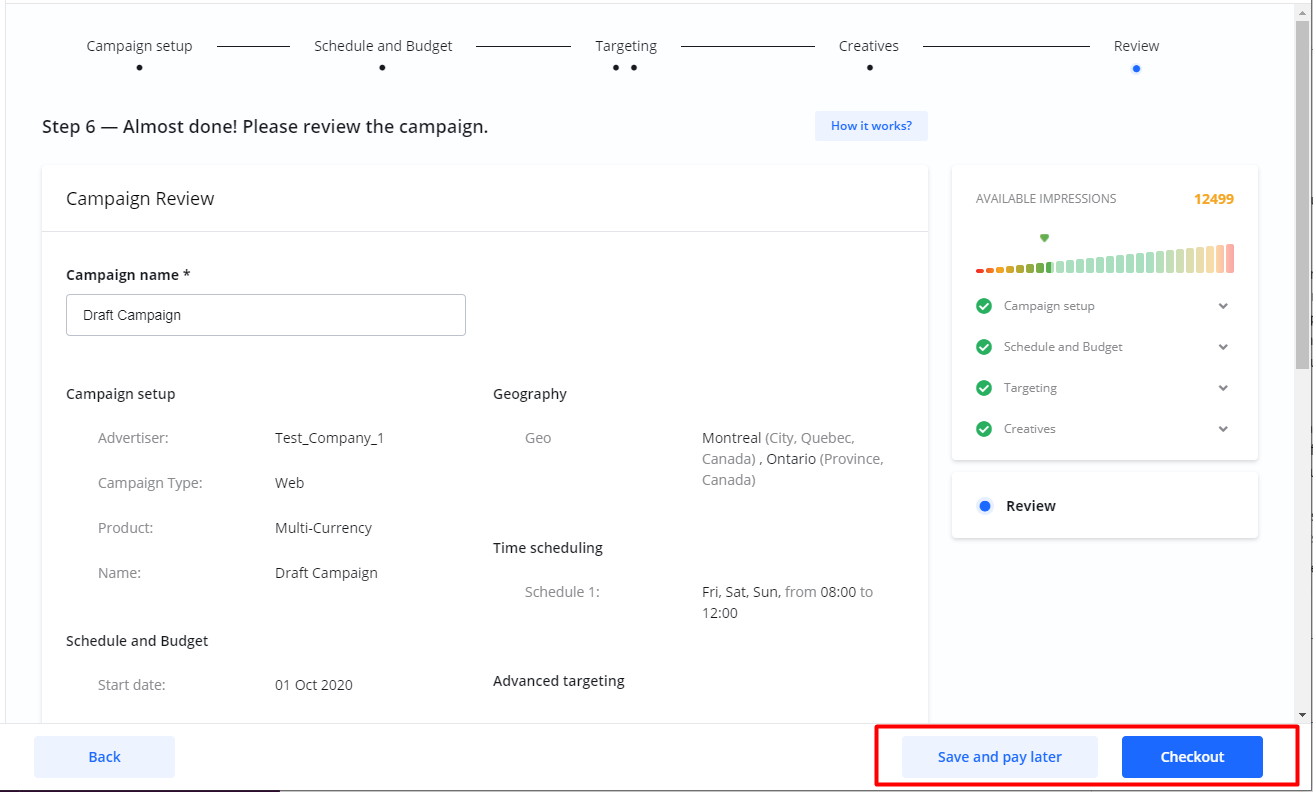
Review - Final step!
Set a descriptive Campaign Name and review your campaign.
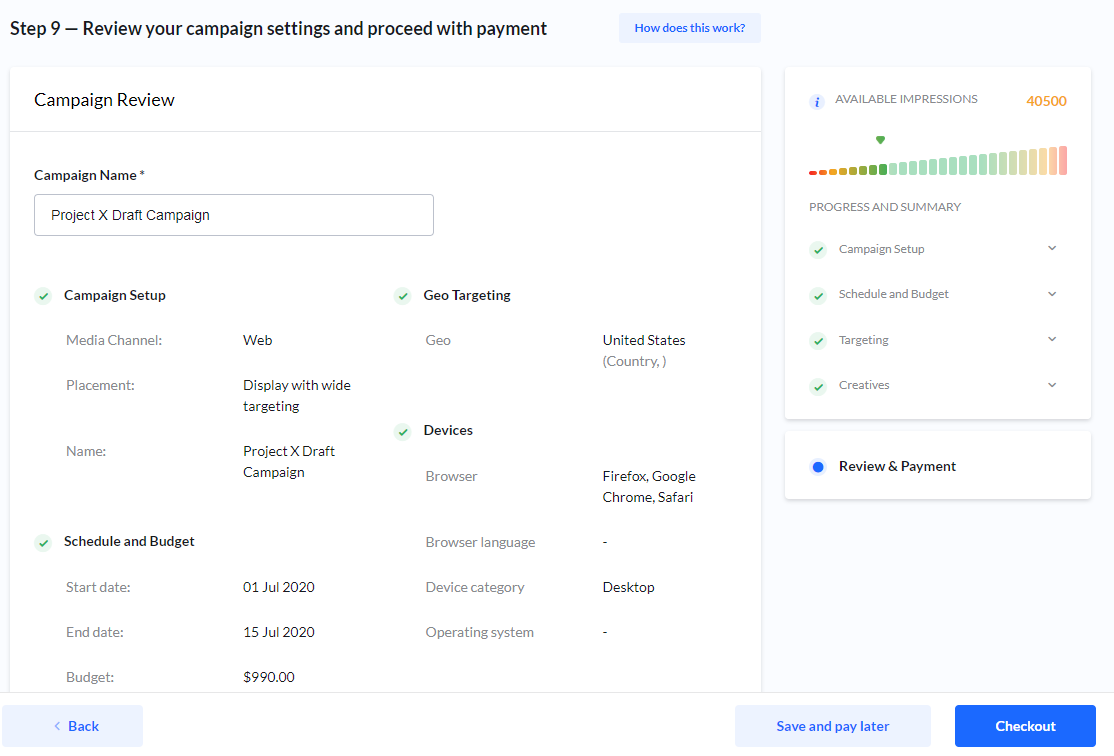
When you are done you can either Save and pay later or Checkout.
Impressions and availability
If you have selected the pre-pay option, the platform is checking availability continuously. You will be notified if there is limited availability.

If availability is high this is good news for you!
You can consider increasing your budget, extending your campaign period or narrowing your targeting for a more targeted campaign.
If availability is low for you, maybe even to the point where you cannot checkout your campaign, you can always adjust your schedule, possibly lowering your budget and consider broadening your targeting.
Checkout and payment
Payment - One campaign
As last step in the Campaign Wizard, you can checkout and pay for the campaign.
You can either pay for a new campaign directly via Checkout or Save and pay later. When you Edit a previous saved campaign, it will be opened in the wizard. If you have not done so yet, you always have the option to Checkout and Pay any campaign.
Create Campaign or Edit an existing campaign.
You can navigate Back and Next as you like.
When you are satisfied with all steps, review the campaign.
You can always change targeting options and add creatives later.
Select Checkout.
You can pay either with a Debit or Credit card or by Invoice.
Card payments are enabled by default. If you wish to pay by invoice please contact the Publisher.
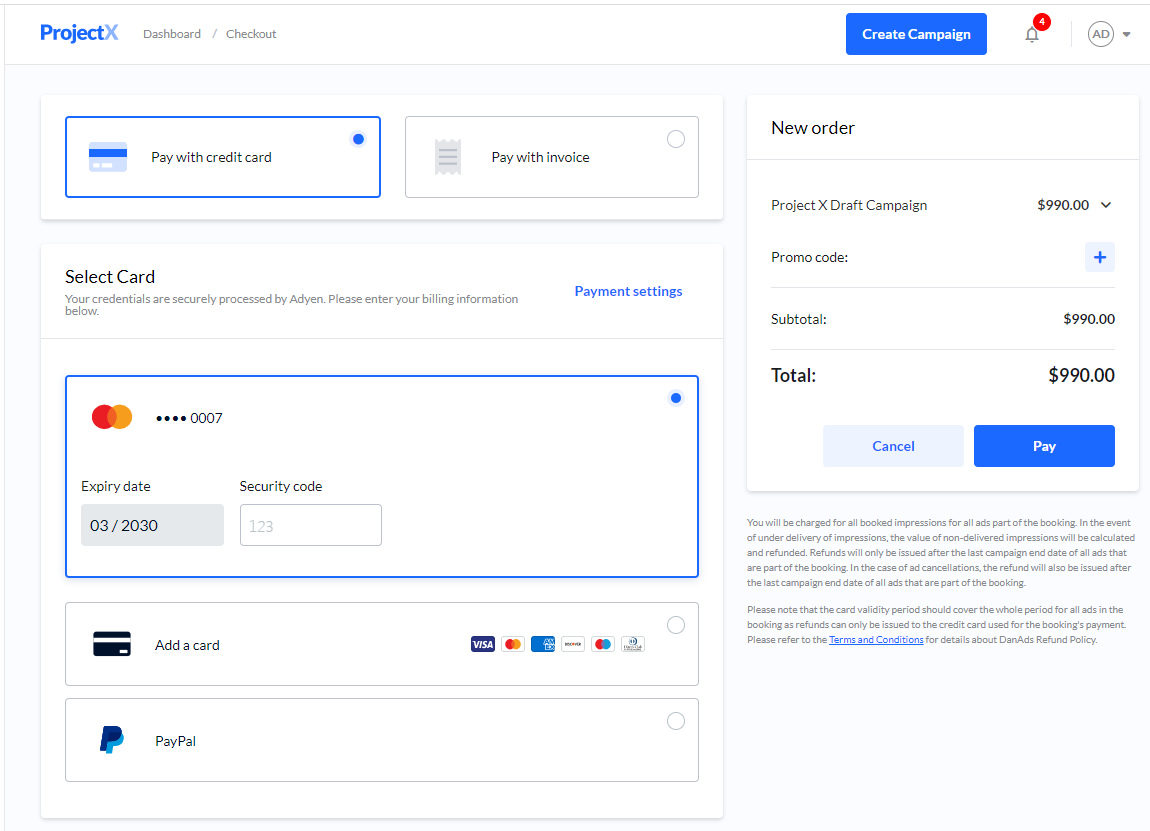
Promo code discount
If you have a promo code you can use it on the Checkout page.
Click the Plus icon.

2. Enter the promo code and select Apply.

3. If the code is valid the discount is applied.

A promo code can be invalid for a number of reasons:
The expiration date has passed.
The code has been used too many times.
Your order does not meet the minimum amount required.
The publisher has revoked the promo code.
If a promo code is invalid, when you try to use it, you will get a message about why.
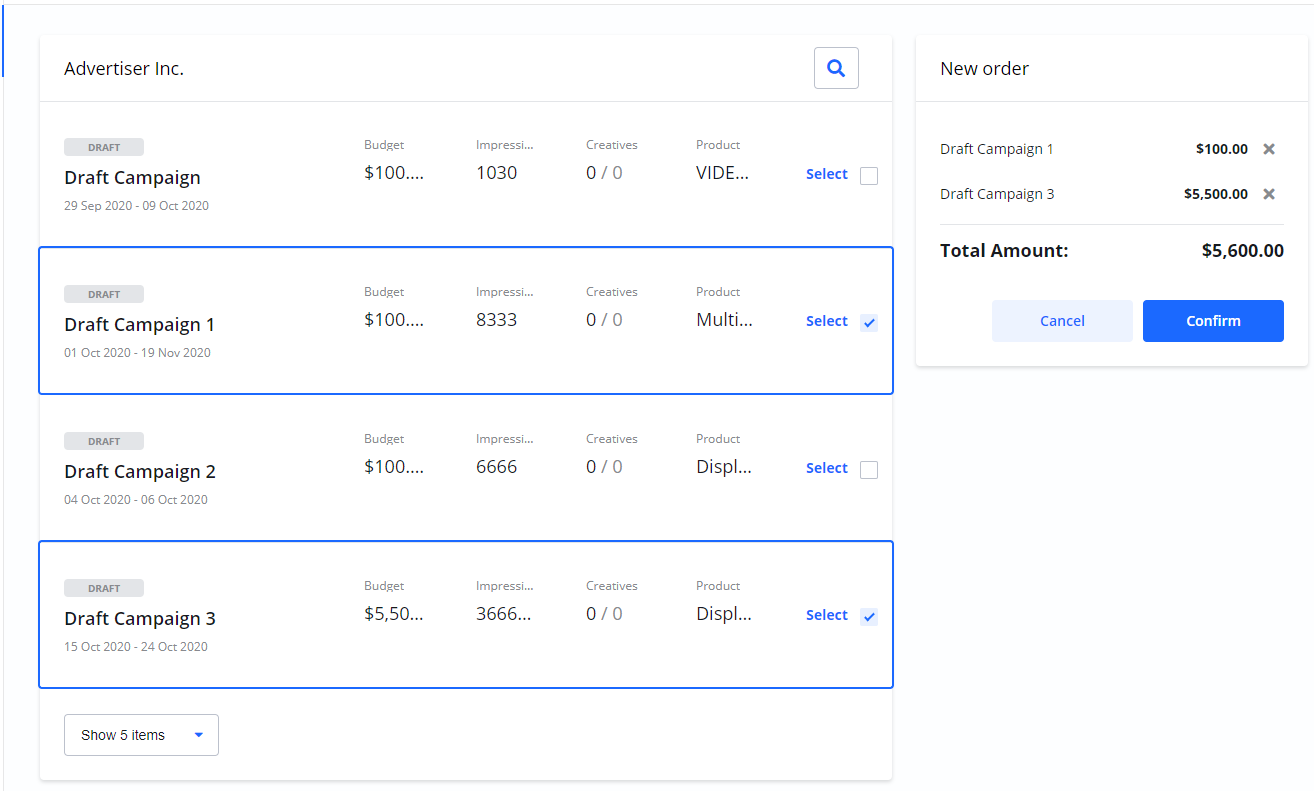
Payment - Multiple campaigns
As an alternative to paying for one campaign at the time, you can pay for multiple campaigns at the same time.
The campaigns you pick will be included in one Order.
From the Dashboard in the Campaigns list, non-confirmed campaigns will show the button Pay.
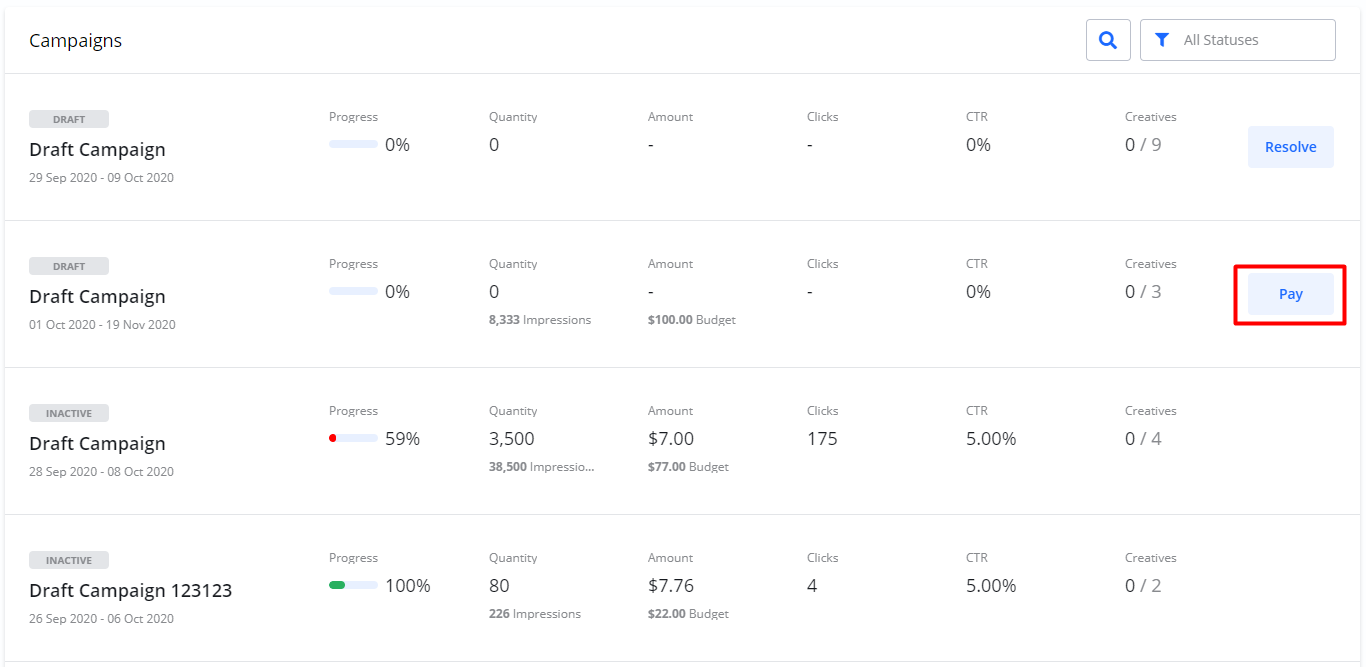
Select Pay
You will see a list of all campaigns that are not yet confirmed or payed for.
Select which campaigns you wish to Confirm.Click Confirm.
Your campaigns are now checked for availability.

If there is not enough availability, you will be notified and can correct and change the campaigns.
Review the new order and select if you want to pay either a Credit Card, a Debit Card or by Invoice.
Depending on from which country your company operates and if you don’t have a valid Tax ID, you might be charged VAT.
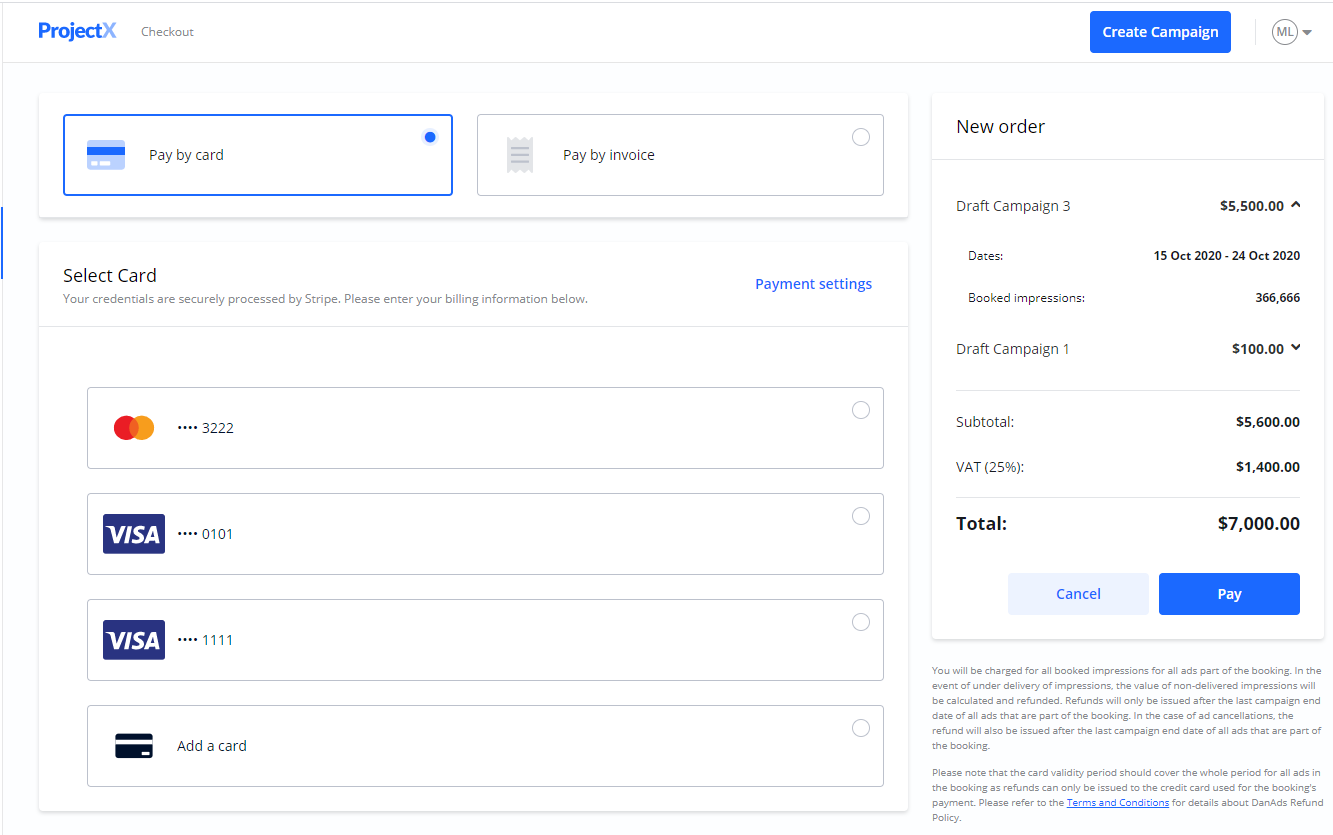
When you have checked the order, click Pay.
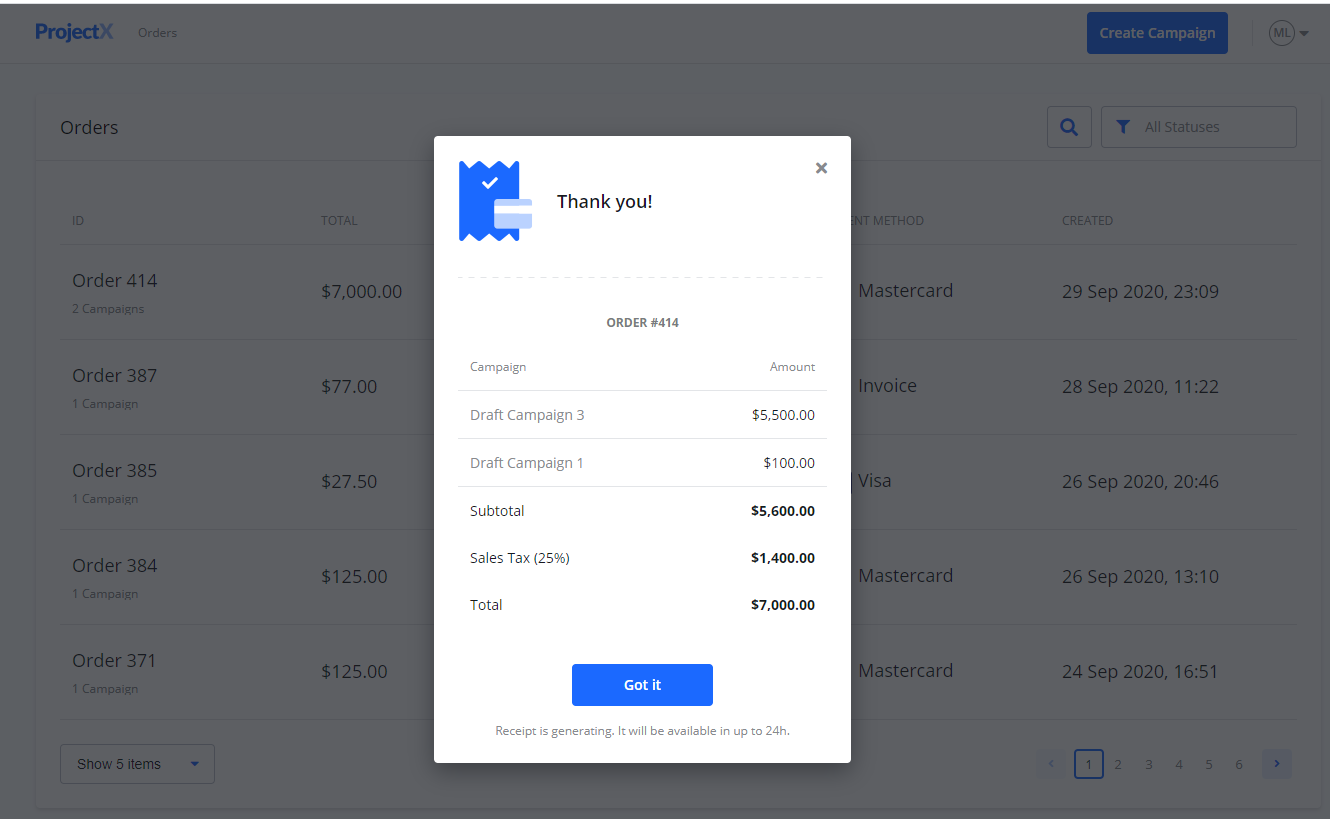
Your card will be charged and a summary of your order is shown.
Subscriptions
Subscriptions are campaigns payed on a weekly basis. If you selected subscription as Budget model when you created your campaign, the Checkout page show you the details for the weekly charge.
Select a Card
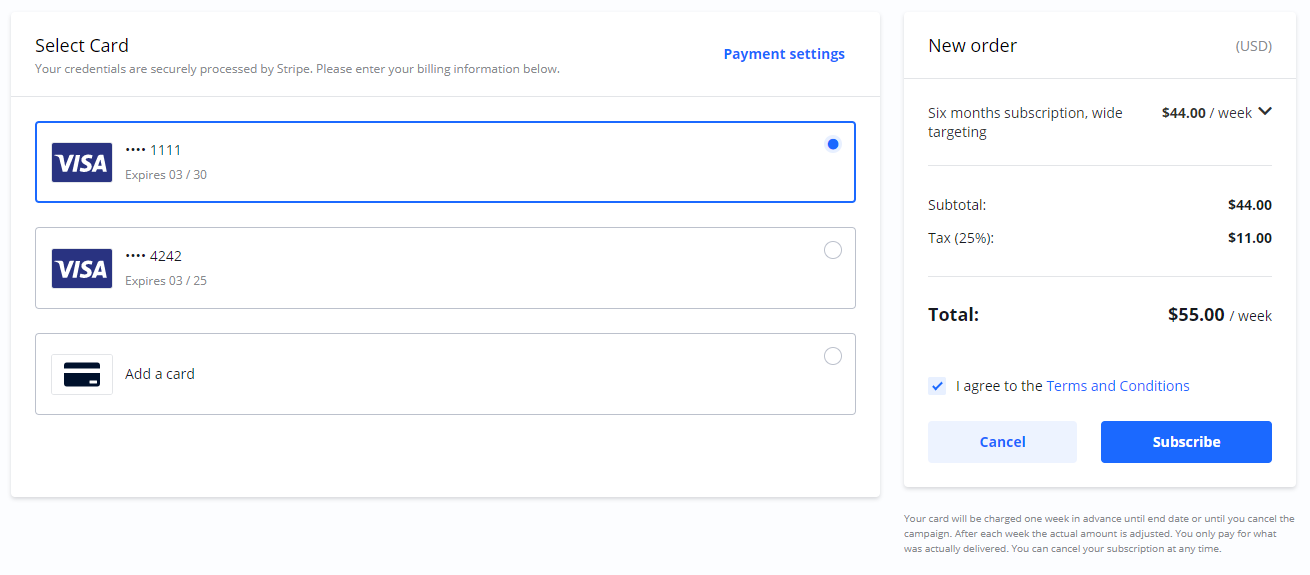
2. Agree to Terms and Conditions.
3. Select Subscribe.
4. You will get an additional confirmation with the campaign details outlined for you.

5. Read it carefully, then select I agree and your campaign will start on the date you have set.
Your card is charged the first time on the same day as your campaign starts. Make sure your card has sufficient funds during your campaigns.
Subscription campaigns
During a subscription, your card will be charged one week in advance until end date or until you cancel the campaign. After each week the actual amount is adjusted. You only pay for what was actually delivered.
You can cancel a subscription at any time.