Welcome!
On this page you will find information specific to you as an Agency.
You will find information about how to
![]() Create Clients.
Create Clients.
![]() Create sub-accounts.
Create sub-accounts.
![]() Assign clients to sub-accounts.
Assign clients to sub-accounts.
![]() Create Campaigns on Client's behalf.
Create Campaigns on Client's behalf.
![]() Check your client's campaigns performances.
Check your client's campaigns performances.
This document is an addition to the Advertiser’s Manual where you will find detailed information on:
![]() Sign up and manage your account.
Sign up and manage your account.
![]() Create campaigns.
Create campaigns.
We are happy you are here and we aim to help you expand your business.
Best wishes from us.
The DanAds Team
Support
If you run into some problems, we are here to help.
There is a Support form on the Landing Page and you can always send an email to support@danads.com directly.
Powered by

Glossary
Here you will find terms and terminology used in the Platform.
Platform term | Definition |
|---|---|
Account | An account is the name and password used to login. Name and password is administrated by each user. There are two types of user accounts, Direct Advertiser account and Agency accounts. |
Ad | An advertisement is the promotion of a product, brand or service to viewers. The goal of an ad is to attract interest, engagement and sales. |
Ad-slot | The space on a web page where an ad loads. |
Add-on price | An add-on price can be added for the targeting options you select. You can identify which options have an added price through a green icon next to the targeting. |
Advertiser | Advertisers are users who have access to The Platform and can book Campaigns. Direct Advertisers create Campaigns for oneself. |
Agency | Agency is a company who creates Campaigns on behalf of their Clients. |
Agency Client | Advertisers linked to an Agency. Clients are administrated by the Agency. Clients are not users of the platform. |
Agency Commission | Percentage of revenue given to Agencies. Commission levels are set in the platform by the Publisher. |
Amount | There are two Amounts in the platform:
|
Audience | Your audience are the users who see and interact with your ads. Audience targeting is a technique you can use to target specific audiences by the user's demographics, past behaviors, interests, income and preferences. |
Budget | Maximum amount you as the Advertiser wants to spend on a Campaign. Budget is entered in monetary amount in your selected currency or entered in impressions or clicks. |
Budget model | Pre-pay and Subscription are Budget models. |
Campaign | An advertising Campaign. A Campaign has a Budget, Start date, Targeting and one or several Creatives. A Campaign’s Type, Placement and Targeting decides where and to whom the advertisement will be shown. |
Campaign Type | The type of media where the Campaign will run. For example Digital Ad, Radio Spot, TV Spot, Print Ad, Social Post, In App, Video, etc. |
Click | When someone clicks your ad. |
CPC | Cost-Per-Click |
CPD | Cost-Per-Day |
CPM | Cost per thousand, (Cost-Per-Mille), a term for the price of 1,000 ad impressions. If an ad placement on a website has a price $2.00 CPM, it means an Advertiser will pay $2.00 for every 1,000 ad impressions. |
CTR | Click Trough Rate. Number of times your ad has been clicked divided by the number of times the ad has been shown. For example, the ad was shown 10000 times, and clicked 45 times: 45/10000 = 0.45 % CTR. |
Creative | The ad shown. It can be a static image, a combination of images and text or a video. Image, Native Ads, Video, Radio Spot, Social post ads and Third Party Script are some examples of Creatives. |
Destination URL | Most Creatives shown on digital media has a Destination URL. The page which is opened when someone clicks your ad. |
Geographical targeting | Also now as Geo-targeting, lets you target your ads to audiences located in specific geographical locations. |
Impression Budget | Based on Budget and Price. How many impressions which are expected to deliver for a Campaign. |
Impressions | Number of times an ad has been delivered on any device. |
KPI | Key Performance Indicators, how the Campaign performance is measured. For example CTR. |
Landing page | The first page of the platform. Describes the platform. Shown to all visitors before login and sign-up. |
Native Ads | Ads that match the look, feel and function of the media format in which they appear. Native ads are often a combination of text and images. |
Notifications | Automatic email notifications send from the platform. |
Placement | The ad-slots where ads will be shown. A placement is most often defined with a Size, a Price, audience Targeting and delivery options. |
Pre-pay | Pre-pay is to settle payment for a Campaign before the Campaign has started. The payment can be settled either with a direct card payment at checkout, or as an invoice payment handled outside of the platform. |
Price | Price in selected Price Model, set on Product level. |
Price Model | When you purchase a Campaign you see the price given in one of several price models. The price model is related to the goal of your Campaign. Prices are calculated using these price models:
|
Product | Preset combinations of Placement, Campaign type, Price, Targeting and available Creatives. |
Product filters | When you create a Campaign you are guided through options such as Price models, Ad types, Campaign goals and Placements. Your selections serves as filters to select the right Product for the Campaign you are creating. |
Promo code | A promo code is a code you enter to get a discount. On checkout it gives you a discount on the current Order. |
Publisher | The Publisher who is licensed to use the platform for delivering ad Campaigns and promotions on their ad network(s). |
reCAPTCHA 
| A method to determine whether the visitor is human or not, for example a robot. When you sign-up to a platform, the CAPTCHA will give you one or more of the following three experiences:
|
Size | Width x height dimensions for an Ad-slot. For digital Campaigns, the ad-slot is measured in pixels. For print Campaigns sizes are measured in mm or inches. |
Targeting | Targeting is an online advertisement technique that refers to the targeted placement of ads. The platform can deliver tailor-made ads based on the user's demographics, past behaviors and preferences. By using targeting, you can unlock these features and increase visibility and user interaction with your ad. |
The Platform | The platform you use to create, pay, monitor and administrate your Campaigns. |
Third Party Script | A technique to serve your ad from other ad management systems. |
Your account
Sign-up and related functionality are described in the Advertiser's Manual.
Sign up
Log in
Forgot password
Manage your account
Dashboard for Agencies
When you have successfully logged in, first page is The Campaign dashboard.
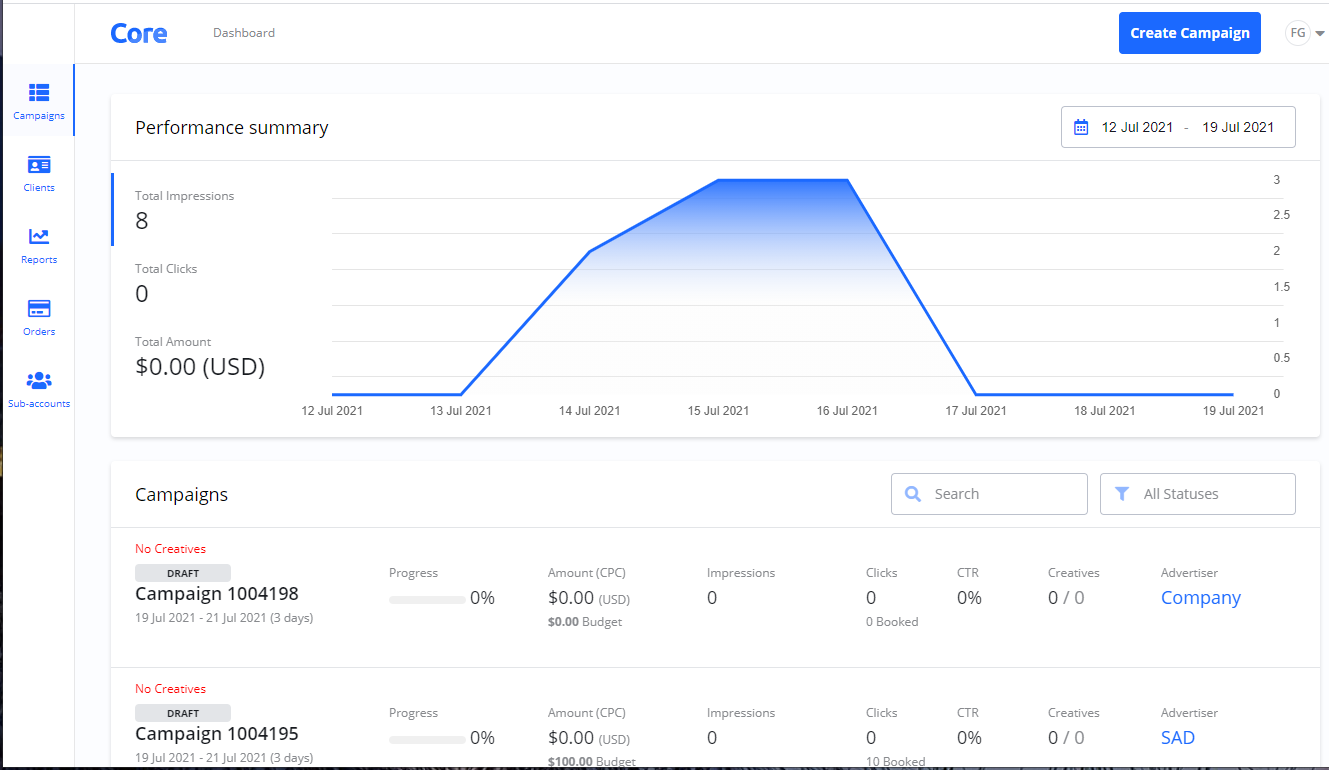
On this page you can:
See all your campaigns.
Check performance summary.
Search and filter your campaigns.
The icon navigation bar
In the icon navigation bar, you have direct access to:
Clients
Reports
Orders
Sub-accounts
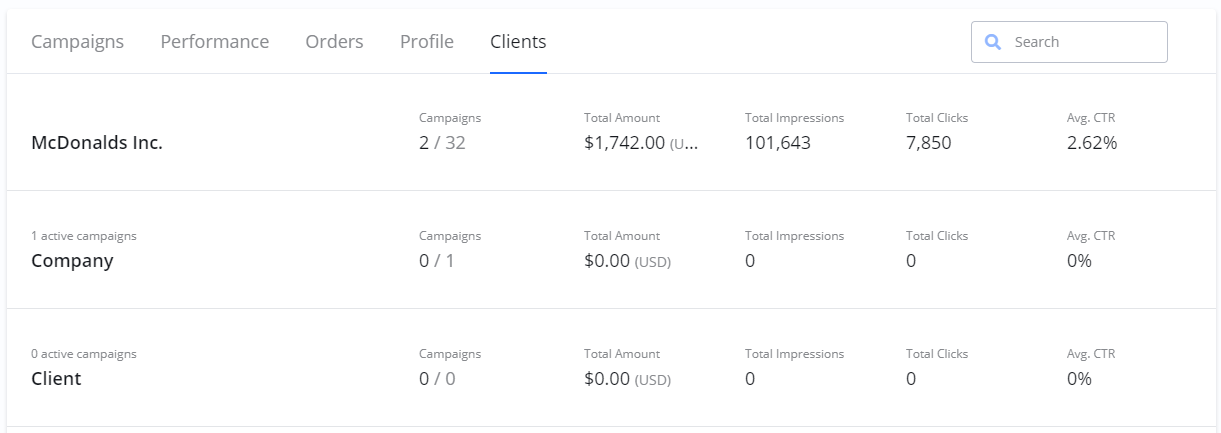
Clients
In the clients listing you have an overview of all your clients.
The list gives you an aggregated view over key metrics like Total impressions, Total Amount, Total Clicks, etc. for each client.
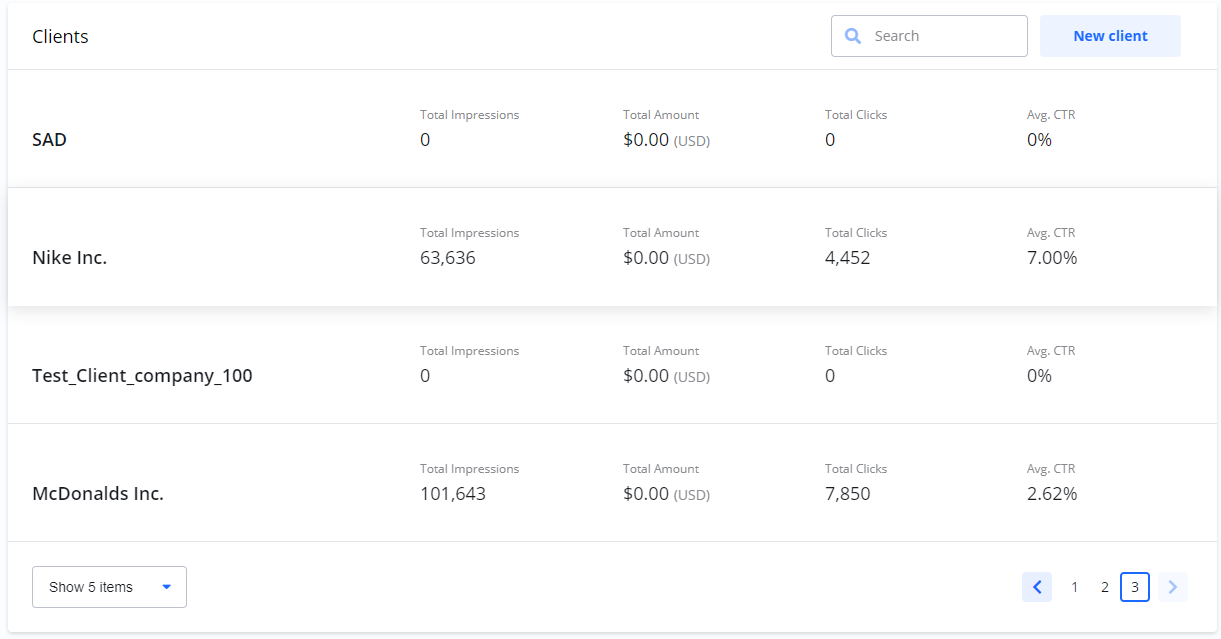
In the clients list you can search and create new clients.
Click on any client will show the Client details.
Reports
Under reports you find reports for:
Campaigns
Order
Clients
You can create one-time reports or schedule reports to be sent to you on regular intervals.
Orders
All order you or any of your sub-accounts have created.
Sub-accounts
Here you have an overview of all sub-accounts.
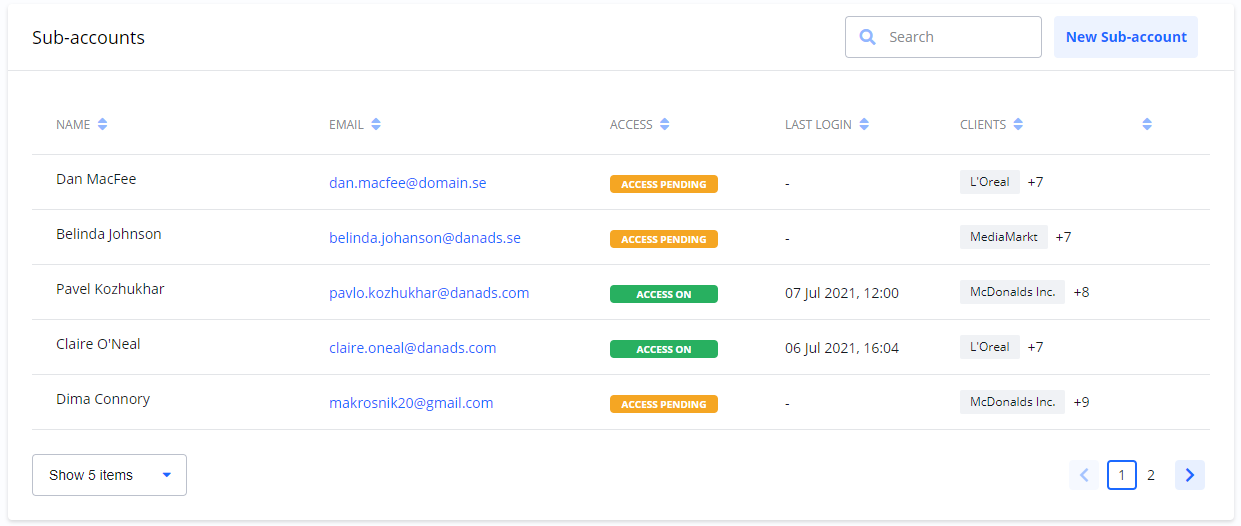
This is where you create new sub-accounts. There is no limitation of number of sub-accounts you can create.
To open the sub-account details. hover over the list and select the icon to open the sub-account details.
Sub-account details
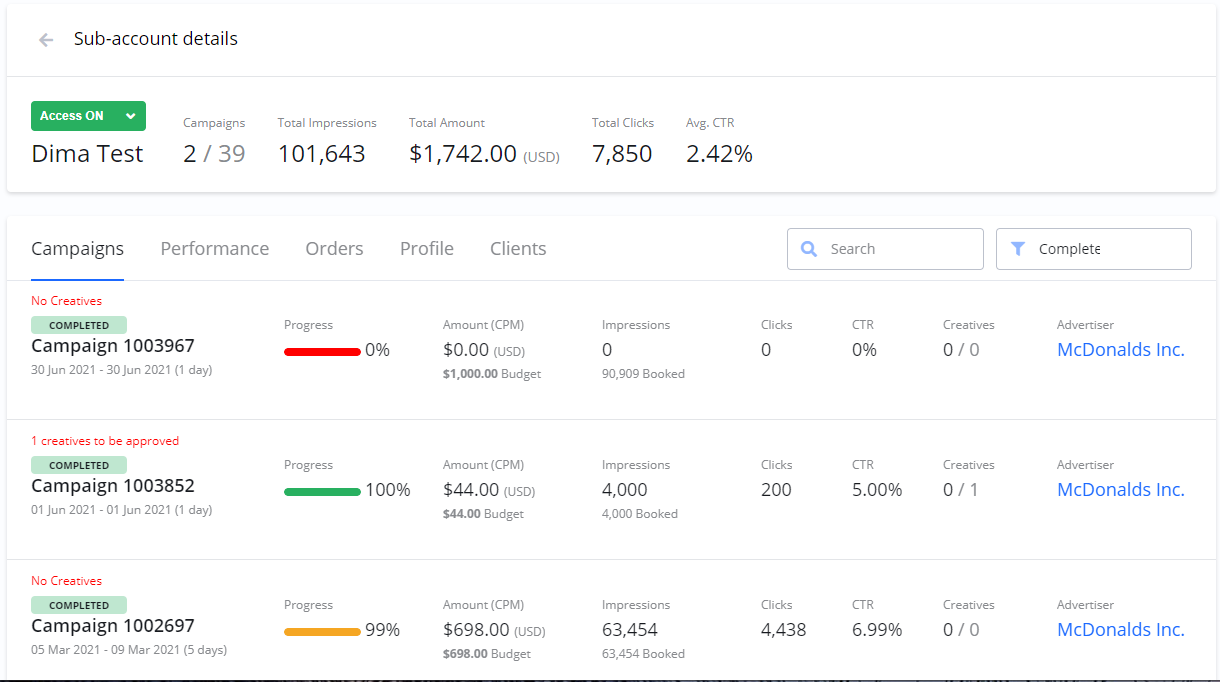
Here you will find everything related to this sub-account.
All campaigns created by this sub-account.
Performance across all campaigns created by this sub-account.
All orders created by this sub-account.
The sub-account profile with basic information, billing address, special commission rates, etc.
All clients this sub-account is assigned to.
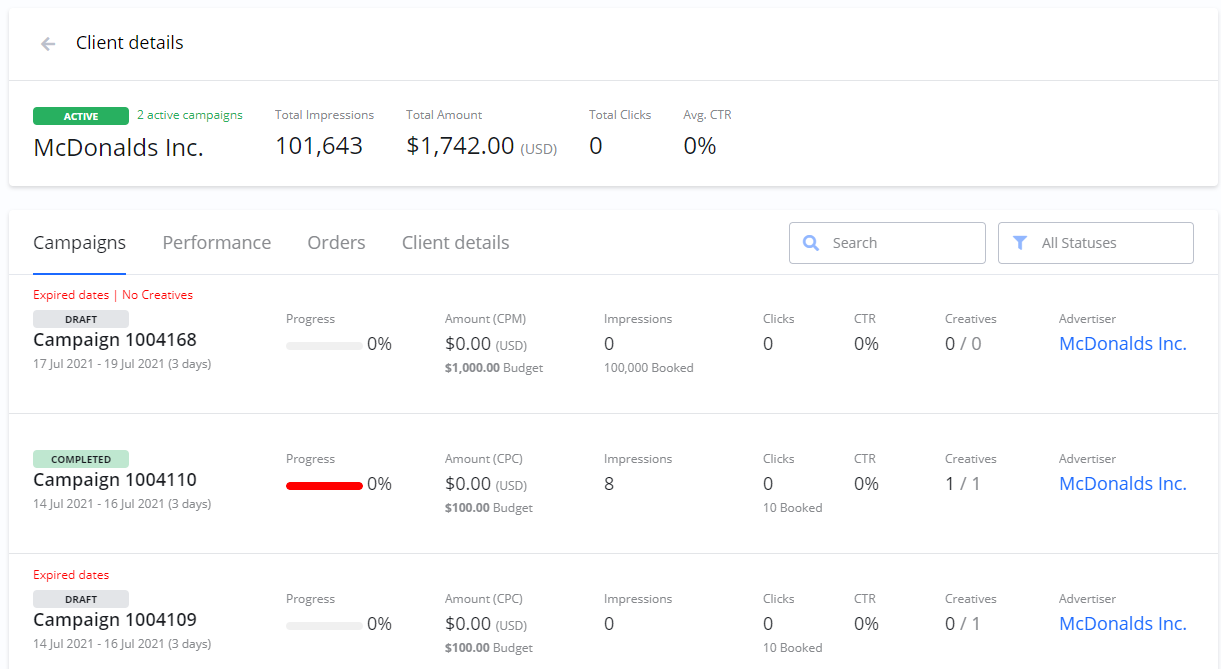
Client details
Client details gives you an overview of:
All campaign you or any sub-account has created for this client.
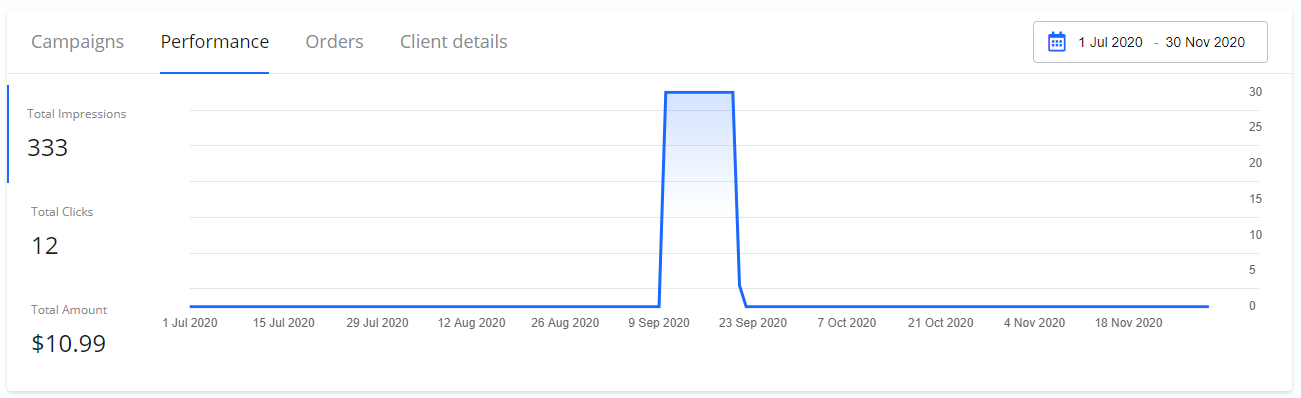
Aggregated Performance across all campaigns for this client.
All orders for this clients.
Client details.
Campaign details show:
Campaigns created for the client.
Aggregated Performance.
Orders
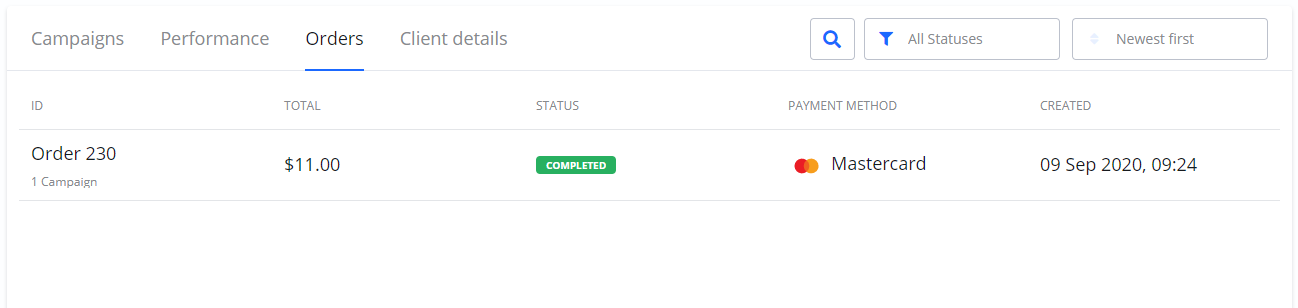
Click on an order to show Order details with:
- Campaigns
- Documents
- Transactions
Client profile
Under Client profile you will find:
- Client general information
- Which user(s) the client is assigned to.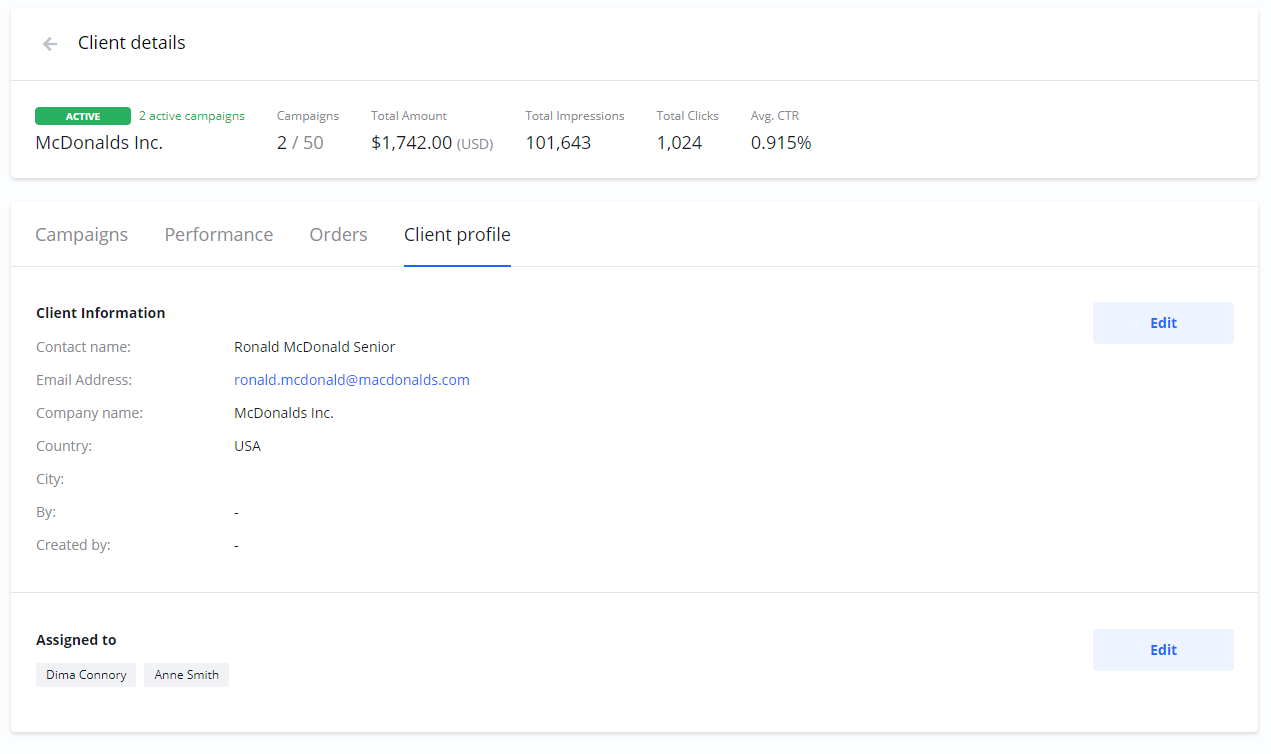
Assign clients to users
On Client details > Assigned to you can set which sub-account is assigned to a client. By doing so the client, the client’s campaigns and orders will only be visible to that sub-account(s). You can assign one or multiple sub-accounts to a client.

Clients which are not assigned to any sub-account are visible to all sub-accounts.
Campaigns
Create a campaign
When you create a campaign you first pick a Client.
The rest of campaign creation is identical to Advertiser > Create campaign.
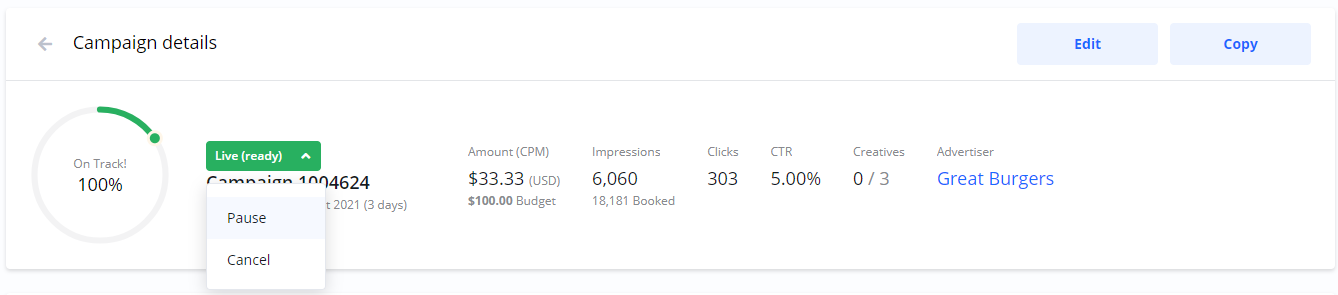
Pause a running campaign
You can Pause/Resume creatives on running campaigns.
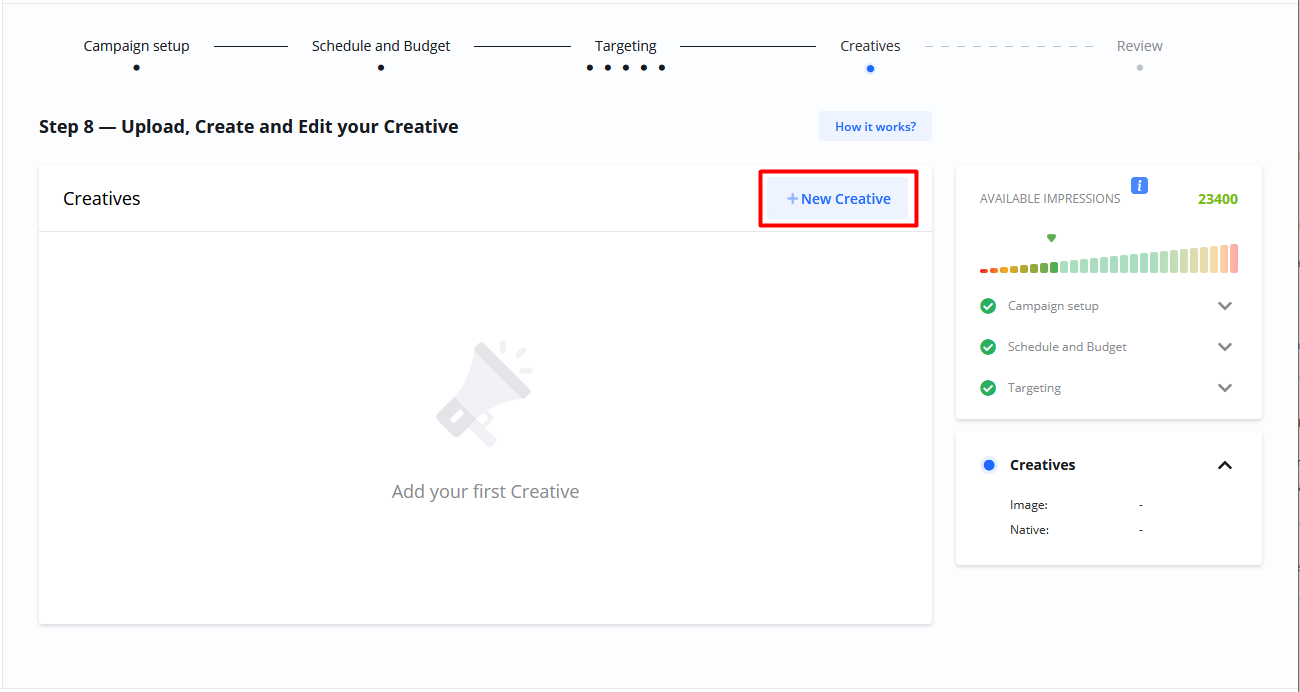
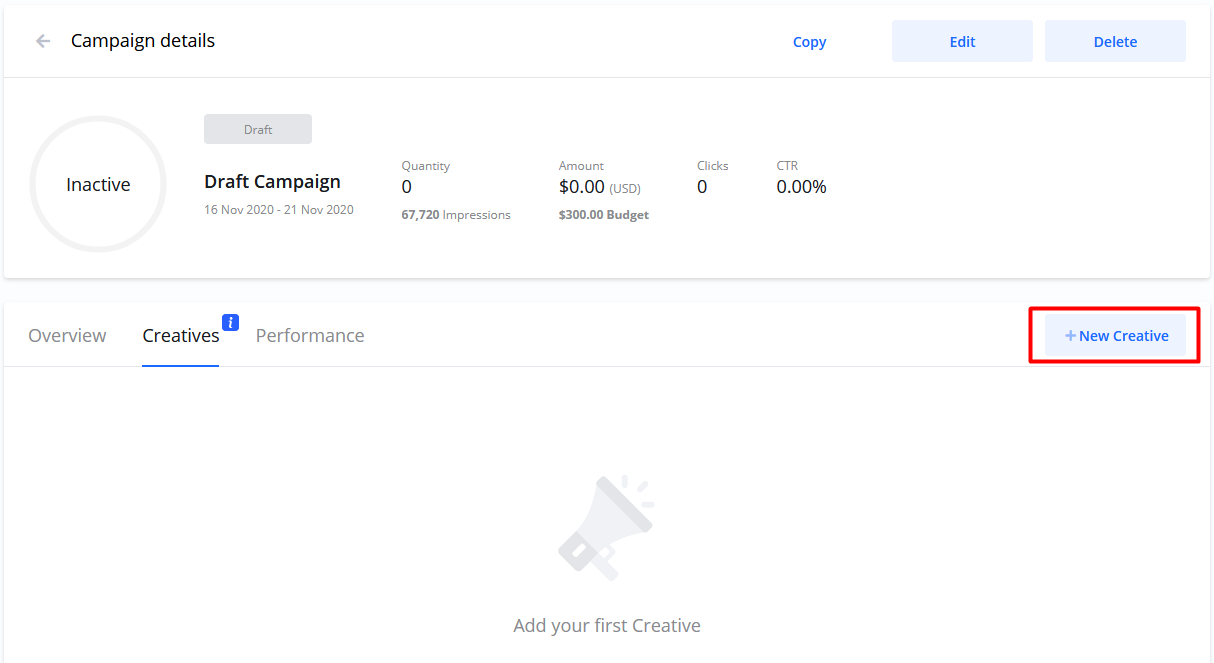
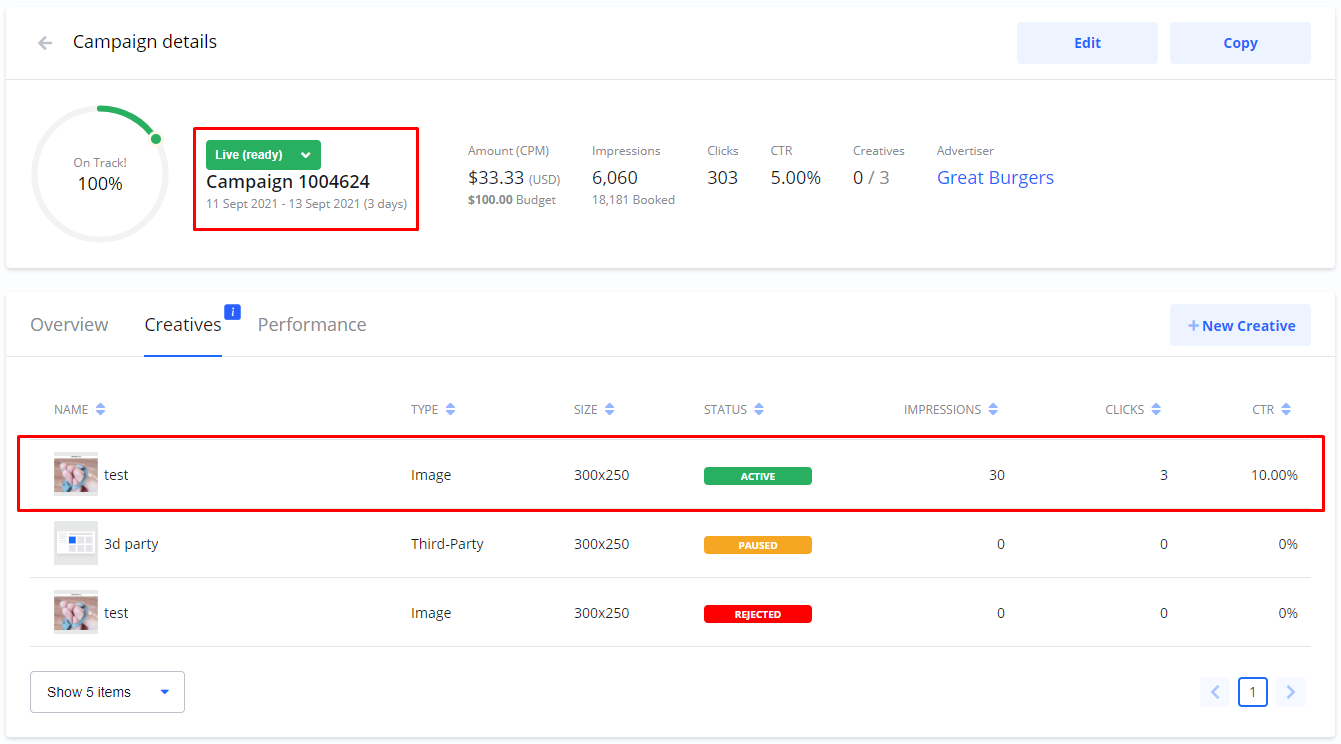
Creatives are the actual ads shown to your audience. You can add as many creatives as you like, and you can add them at any time. Depending on the type of campaign you are setting up, different creative options are available. You can upload images in different sizes, design your ads from scratch, use creatives from a third-party provider or upload videos. Before your ad can be shown to audiences it is reviewed by the publisher and either approved or rejected. You will find the publisher’s Creative Approval Policy in the creative wizard. You can add creatives from the Create Campaign wizard and from the Campaign details. Create Campaign > Creatives > Add Creative. Campaign details > Creatives > New Creative In this step you choose what type of ad you want to create. You can also select a creative you have previously used from your Creative library. You will find detailed descriptions via the links. Build your Ad Third Party Script Your Creative Library After adding your creative to your campaign, it must be approved before your ad can be shown to audiences. You can pause individual creatives or pause all of them by pausing the campaign. Here are the different statuses and how they are used: When you first add a creative it is in DRAFT status. You will be notified by email if your creative is approved or in case of rejection, the reason why it was not approved. If your creative is rejected you can copy it and make changes or add a new creative. Approved creatives automatically go to ACTIVE. ACTIVE creatives can be PAUSED and RESUMED by you at any time. If all creatives under a campaign are paused the campaign status will change to PAUSED. For uploaded Video creatives there is an additional status PROCESSING. During Processing the publisher is making sure your video is entered in the ad-server correctly. You can pause any creatives at any time. Pausing means the ad will stop being shown to anyone. You can also pause all creatives at the same time by pausing the campaign. Open Campaign details > Creatives To pause all creatives select Pause from the status drop-down. To pause individual creatives click the Pause icon. When you pause creatives status changes to PAUSED You can Resume a paused creative whenever you like. When you do, the creative status changes to ACTIVE. If a campaign is paused you have to Resume it before your ads can be shown. When a campaign is LIVE it will show ACTIVE creatives. REMEMBER!Creatives
Add Creatives
Creatives types
Depending on what type of campaign you are creating, the available creative types will change. 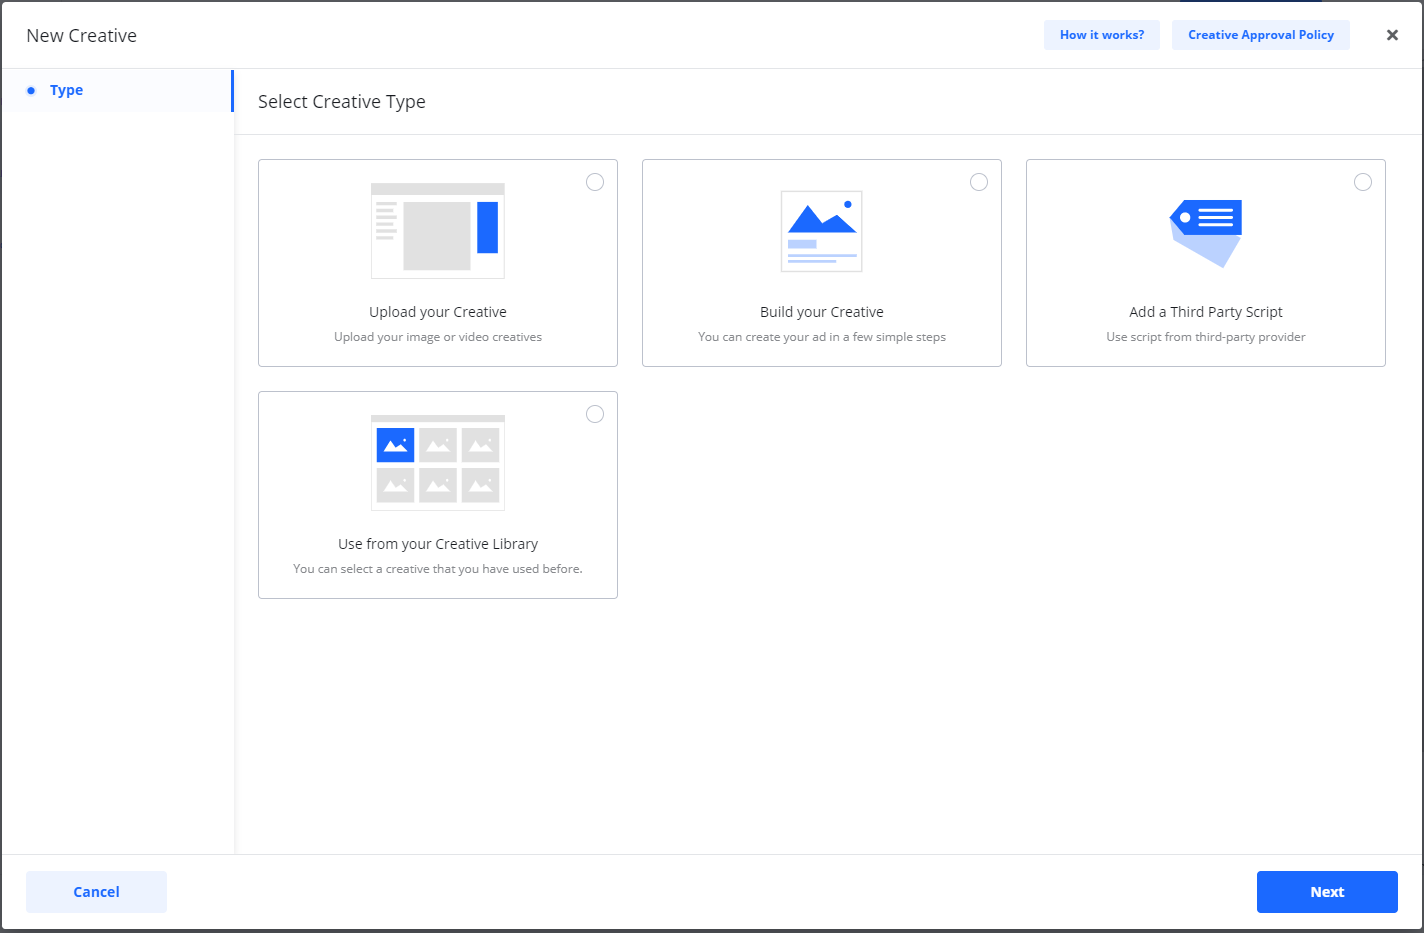
Also known as Native ads.
When your ad is served by a third party provider.
When you want to use a creative you have used before.Creative statuses
Creatives statuses
When a new campaign is confirmed/payed by you, or you add a new creative to an existing confirmed campaign, the creative is UNDER REVIEW.
The publisher will get an email notification and your creative will be either Approved or Rejected.
Active creatives are ready to be served after campaign start date.Pause/Restart creatives
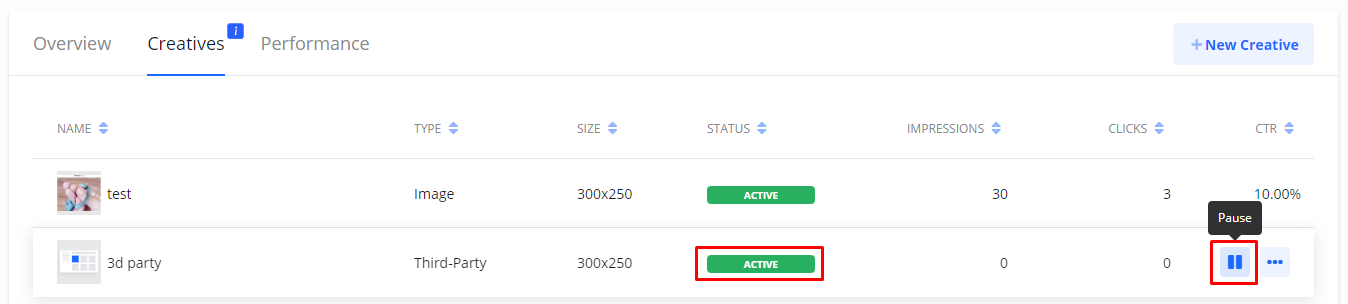
NOTE: If your campaign is live, and this was the only ACTIVE creative, the campaign status also changes to PAUSED.
NOTE: Active creatives will not be shown to your audience until your campaign is LIVE.
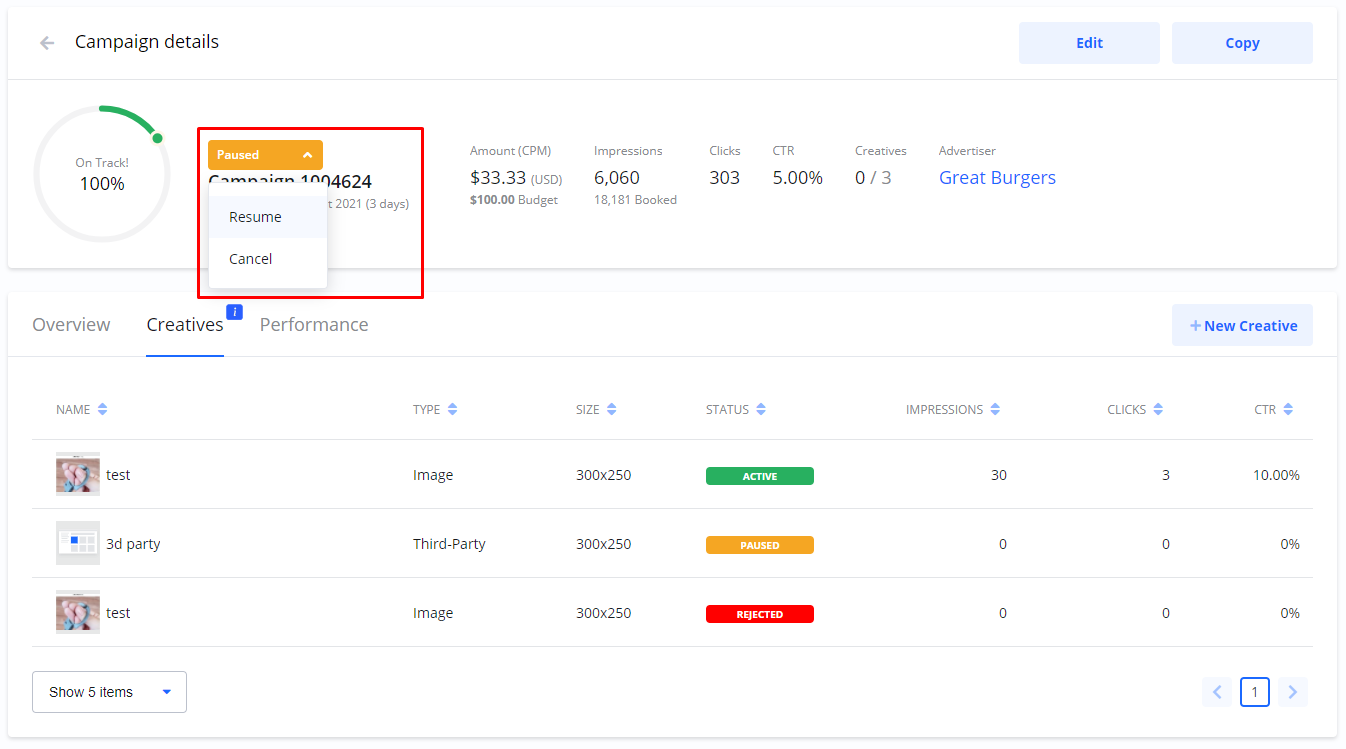
Paused campaigns must be resumed by you manually before the ads will be shown.
If you want to create your ad from just one image or a video, you can do so by the option Upload your Creative. You add creatives directly from the Wizard or under Campaign details > Creatives. Select + New Creative Select Creative Type appropriate for your campaign. If the Type of creative you are looking for is not available, check the previous step in the Wizard to see which are the Available Creatives. Select Format. Select the image for your ad. You can: You can adjust and crop the image by the Edit image link. Click Next. Add Details: Select Complete when you are done. Your new creative is shown in the list. Creative statuses: If your campaign is checked out by card or set for invoice payment, the status for new creatives will be Under Review. Creatives with this status are automatically sent for approval. If you have not yet checked out the campaign, the status of new creatives will be Draft. TIP: By adding creatives to as many as possible of the available sizes, your campaign has a higher chance of reaching it’s goal.Image Creative / Display
For image and video creatives, select Upload your Creative.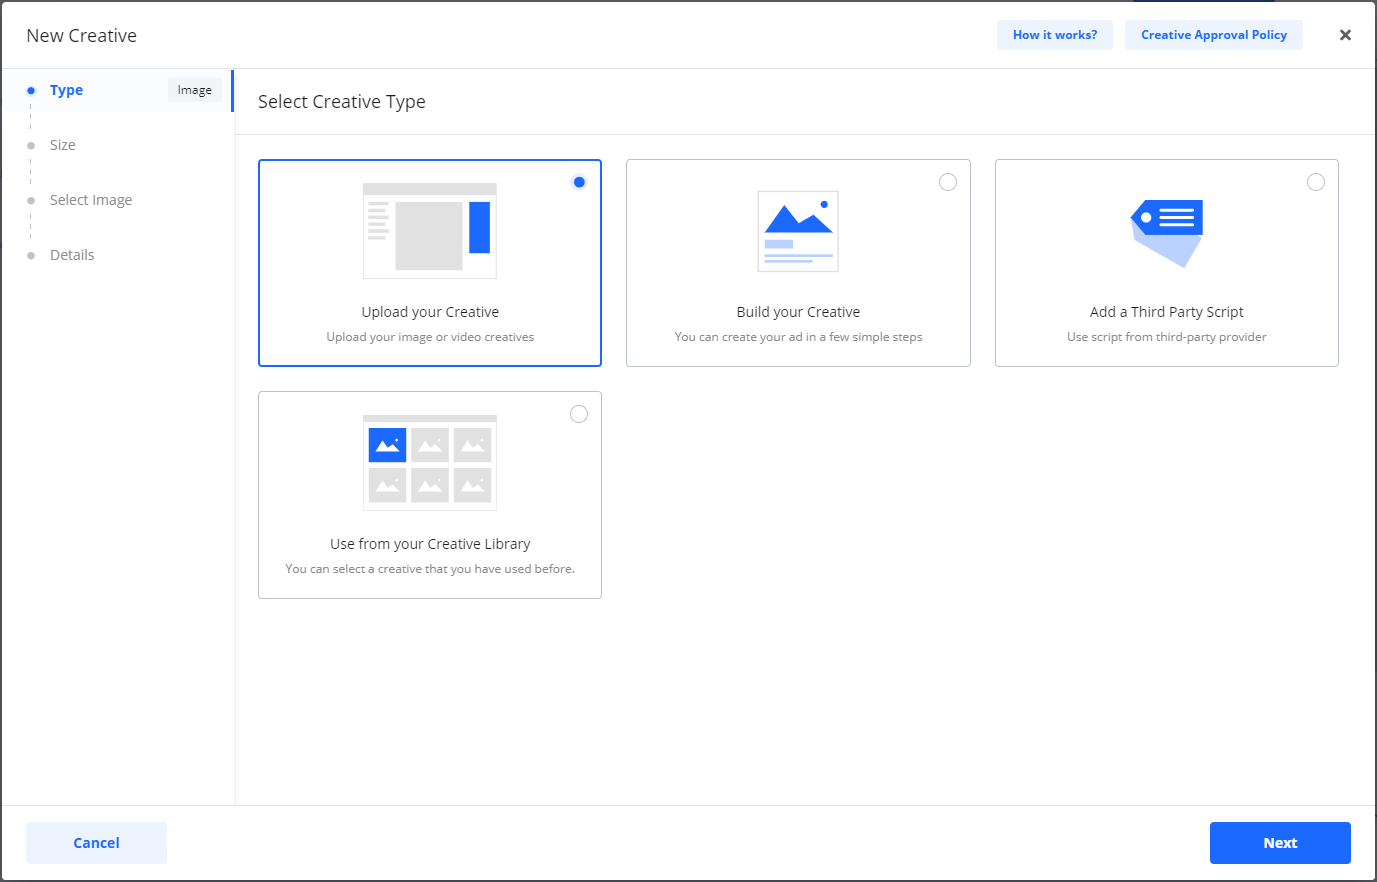
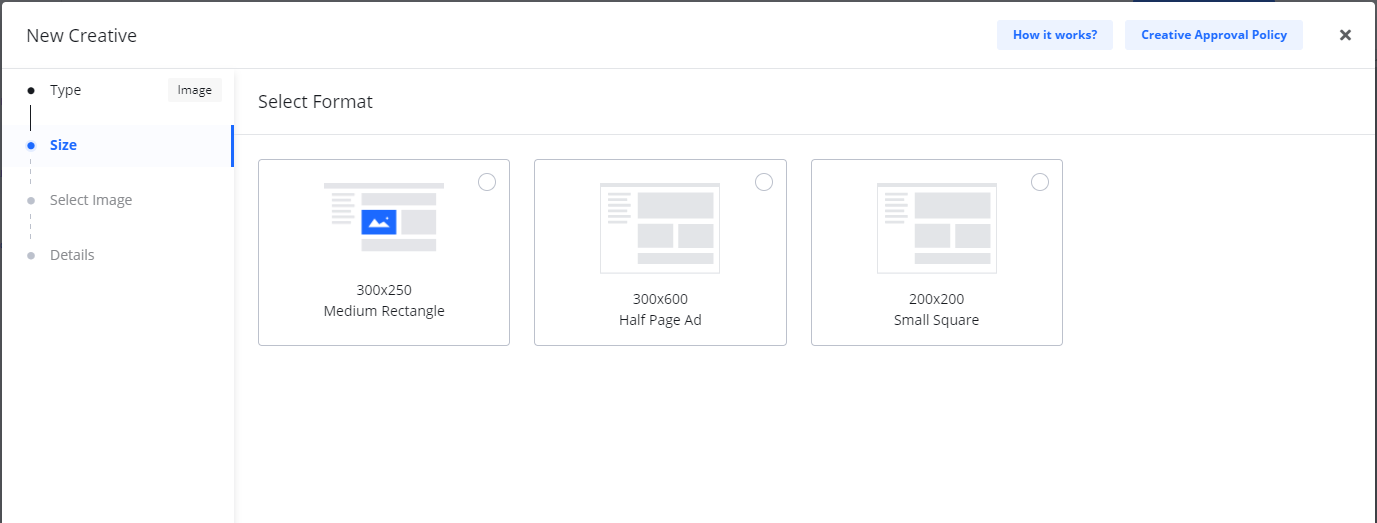
If the format you are looking for is not available, check the Product step in the Wizard to see which creatives are available.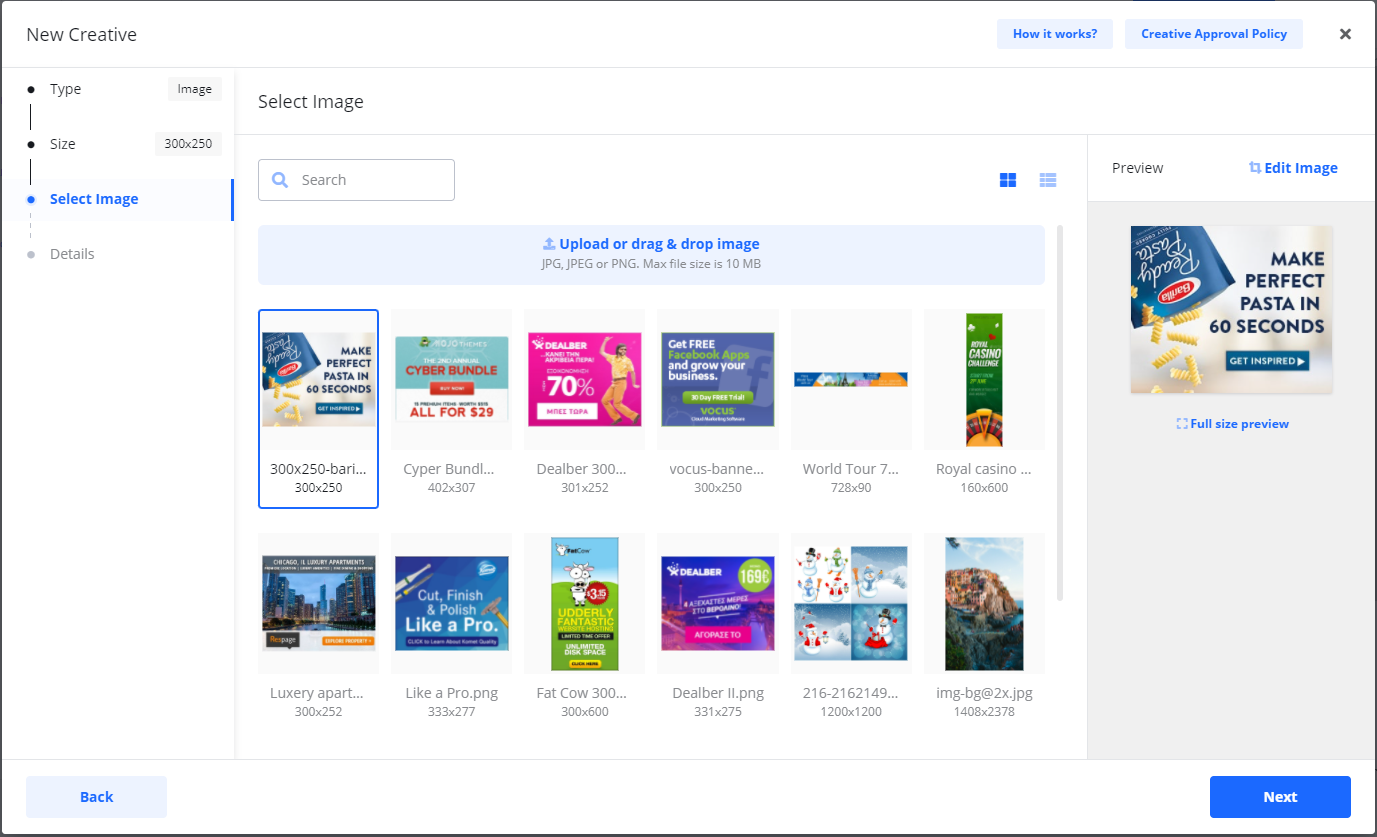
- Upload an image from your computer.
- Drag an image from your desktop.
- Select and image from your previously used images.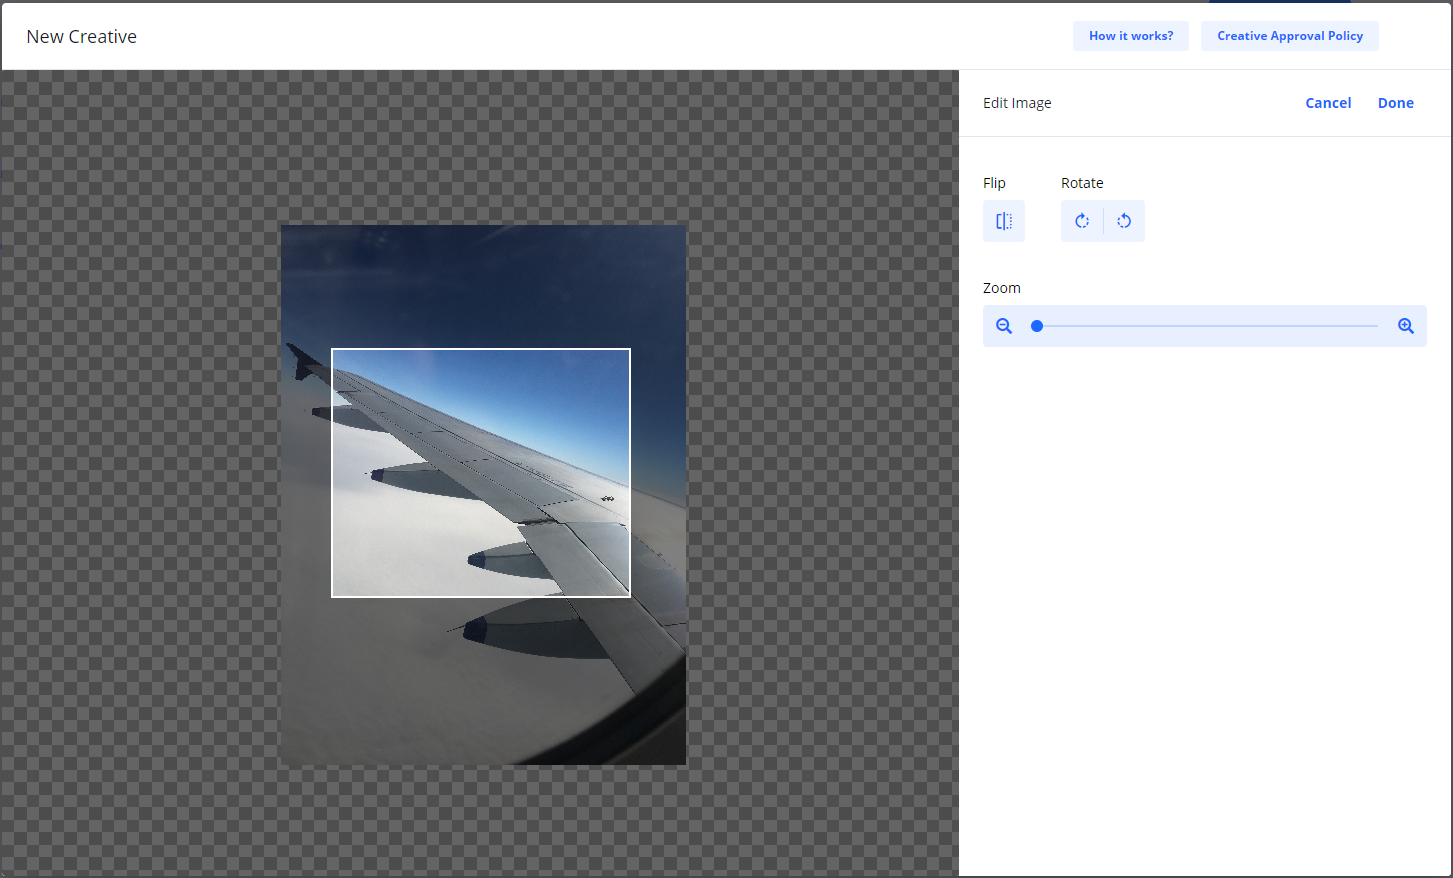
- Creative Name (only you will see this)
- Destination URL (the page your audience will be redirected to when they click your ad)
- Third-party tracking URL (optional)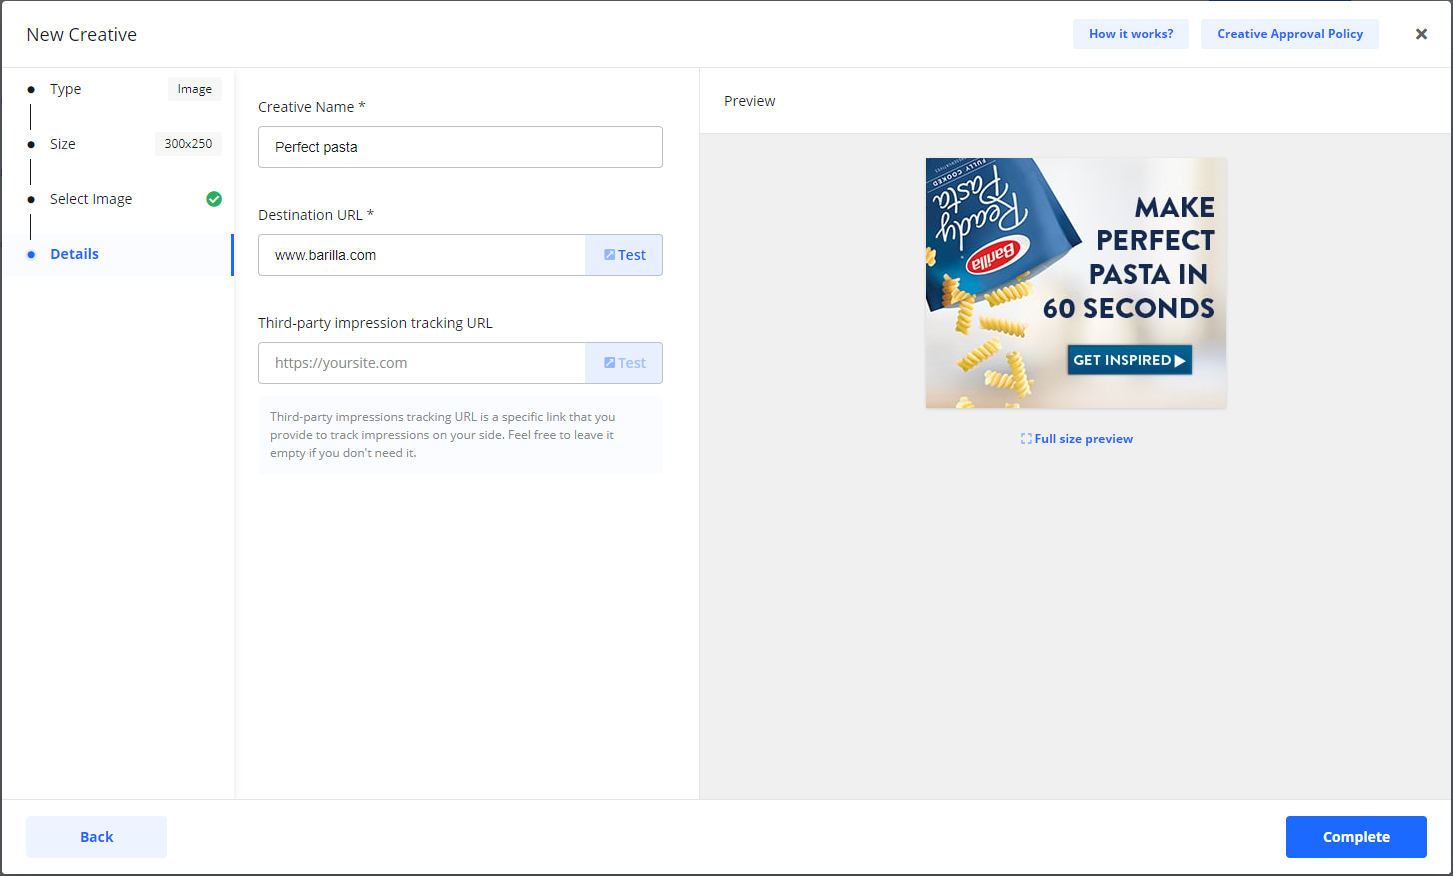

When you check out a campaign, Draft creatives under the campaign will change status to Under Review and is sent for approval.Power tip for image ads!
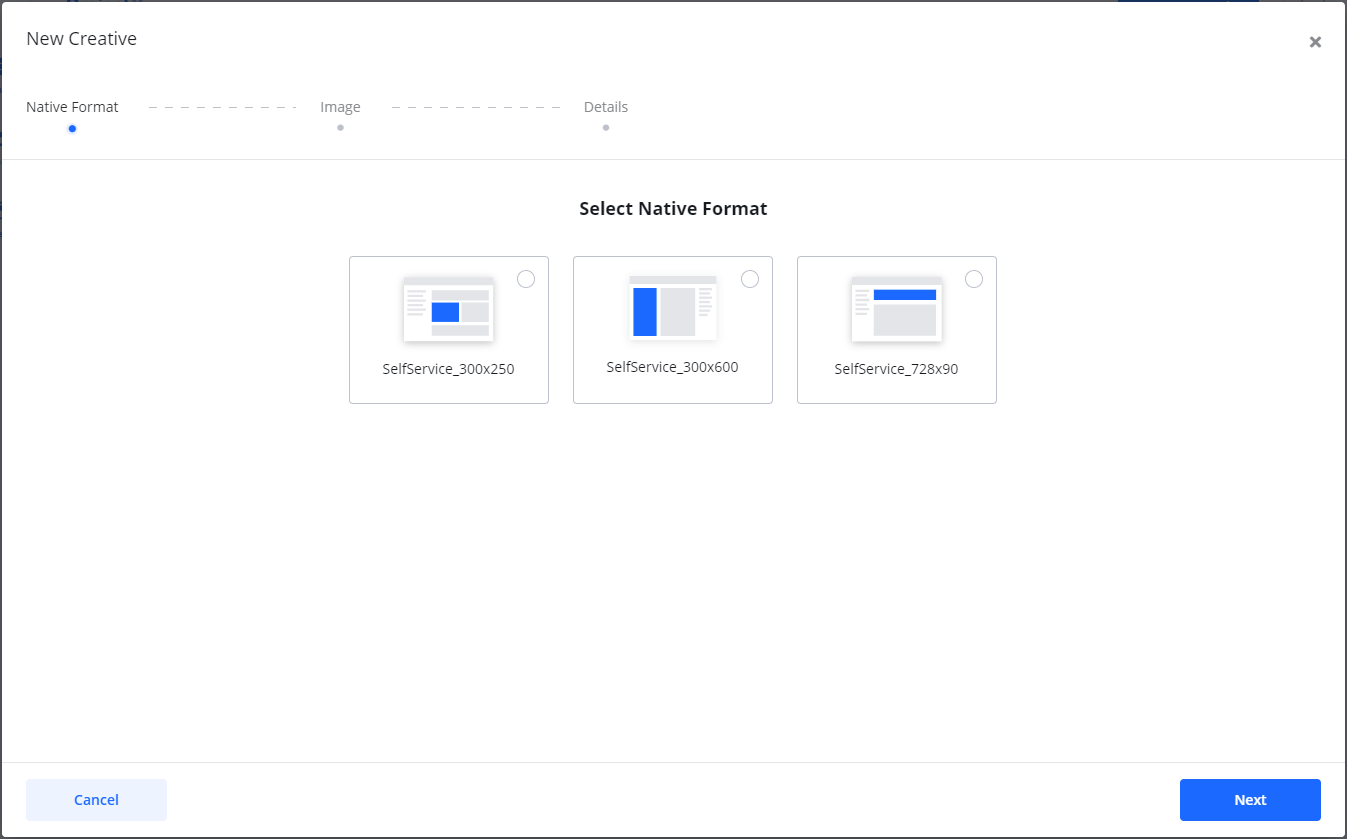
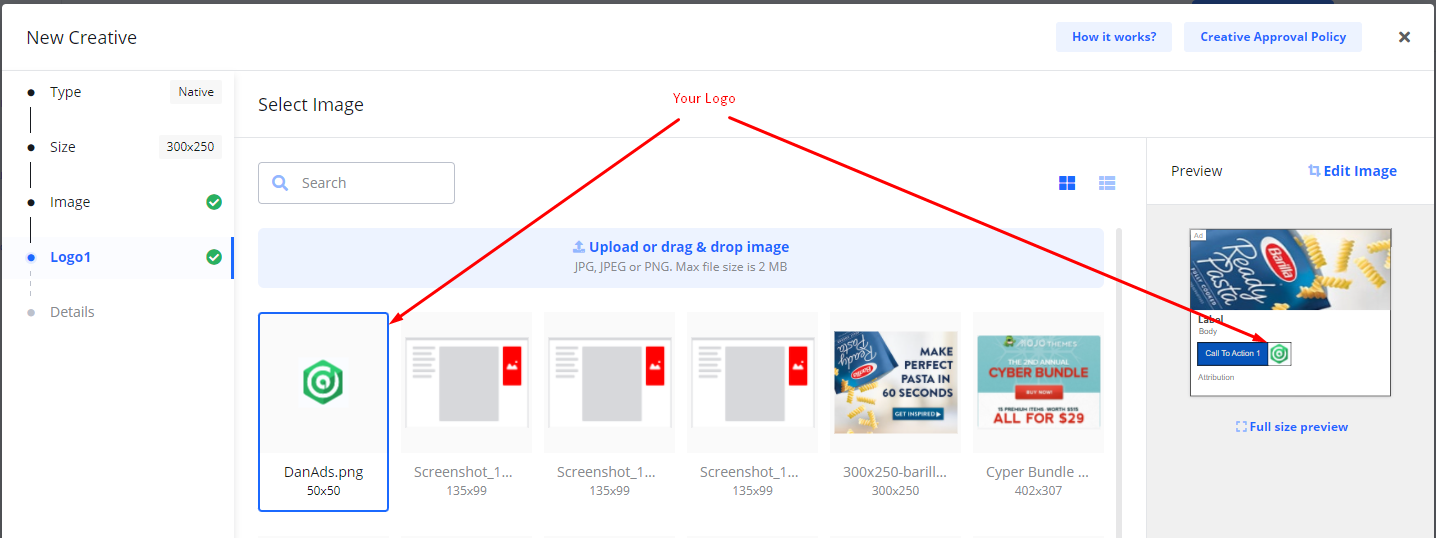
You can build the creatives for your ad in a few simple steps. This type of creative is called Native. It will adopt to the look and feel of the website and context it is shown in. A native ad usually contains an image, your logo, a headline, text and a link to your website or any other location on the internet. You can add creatives directly from the Wizard or under Campaign details > Creatives. Select + New Creative Select Type Native. Select a Format / Size that is appropriate for you. If the format you are looking for is not available, check the Product step in the Wizard to see which are the available sizes. Select the main image for your ad. You can: Under Edit image you can adjust, crop, flip, rotate and zoom the image. After you have finished editing your image, click Done. Add Logo or any Secondary Image if available. Click Next. Add Details: Select Complete when you are done. Your new native creative is added to your campaign. Creative statuses: If your campaign is checked out by card or set for invoice payment, the status for new creatives will be Under Review. Creatives with this status are automatically sent for approval. If you have not yet checked out the campaign, the status of new creatives will be Draft. Build your ad - Native ads
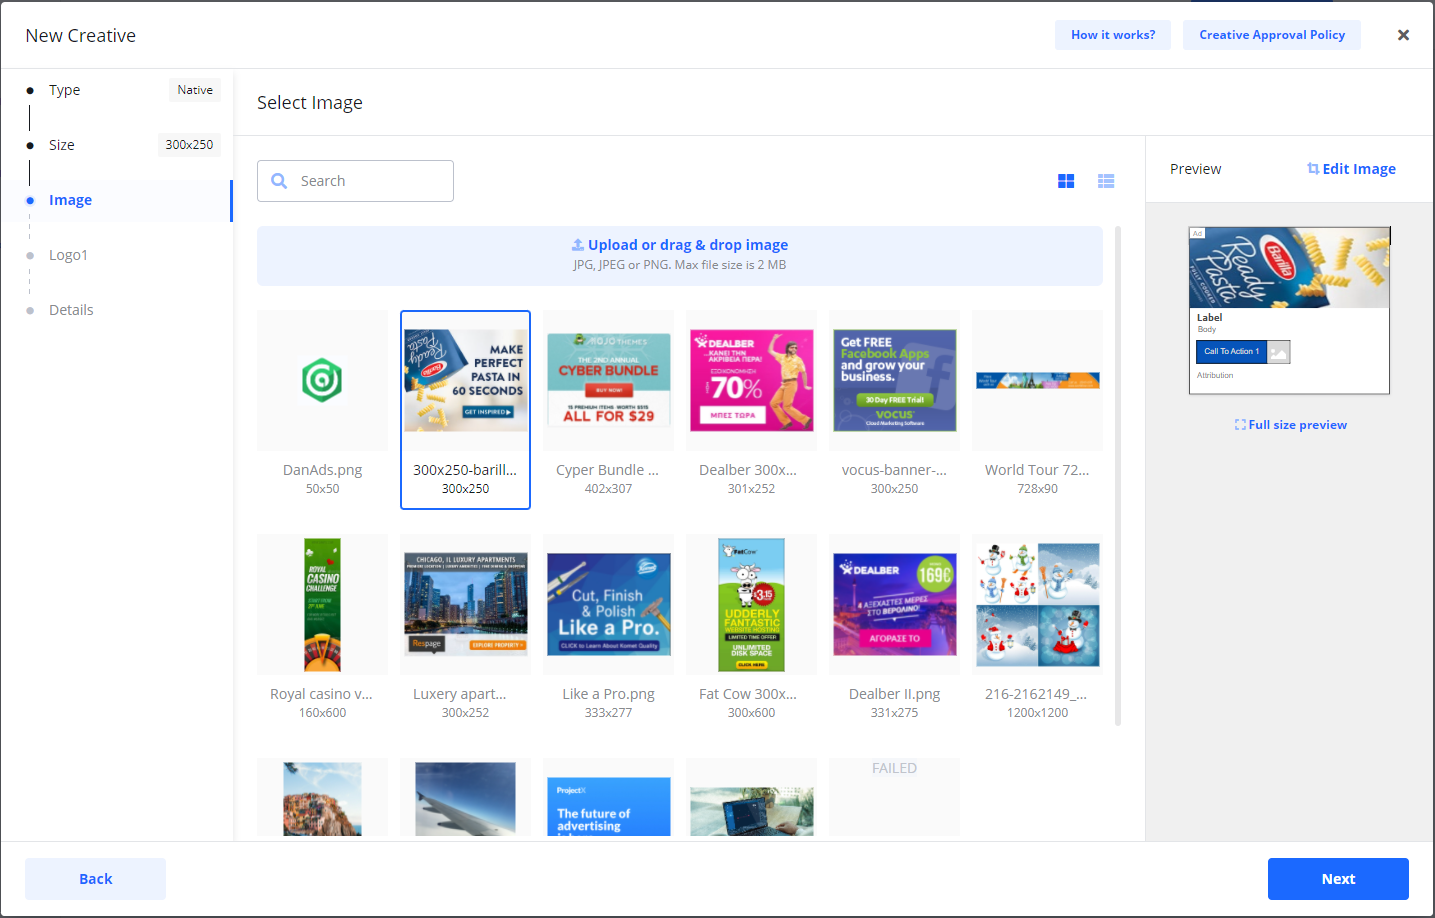
- Upload an image.
- Drag an image from your desktop.
- Select an image from previously used images.
The goal here is to make the image fit the size.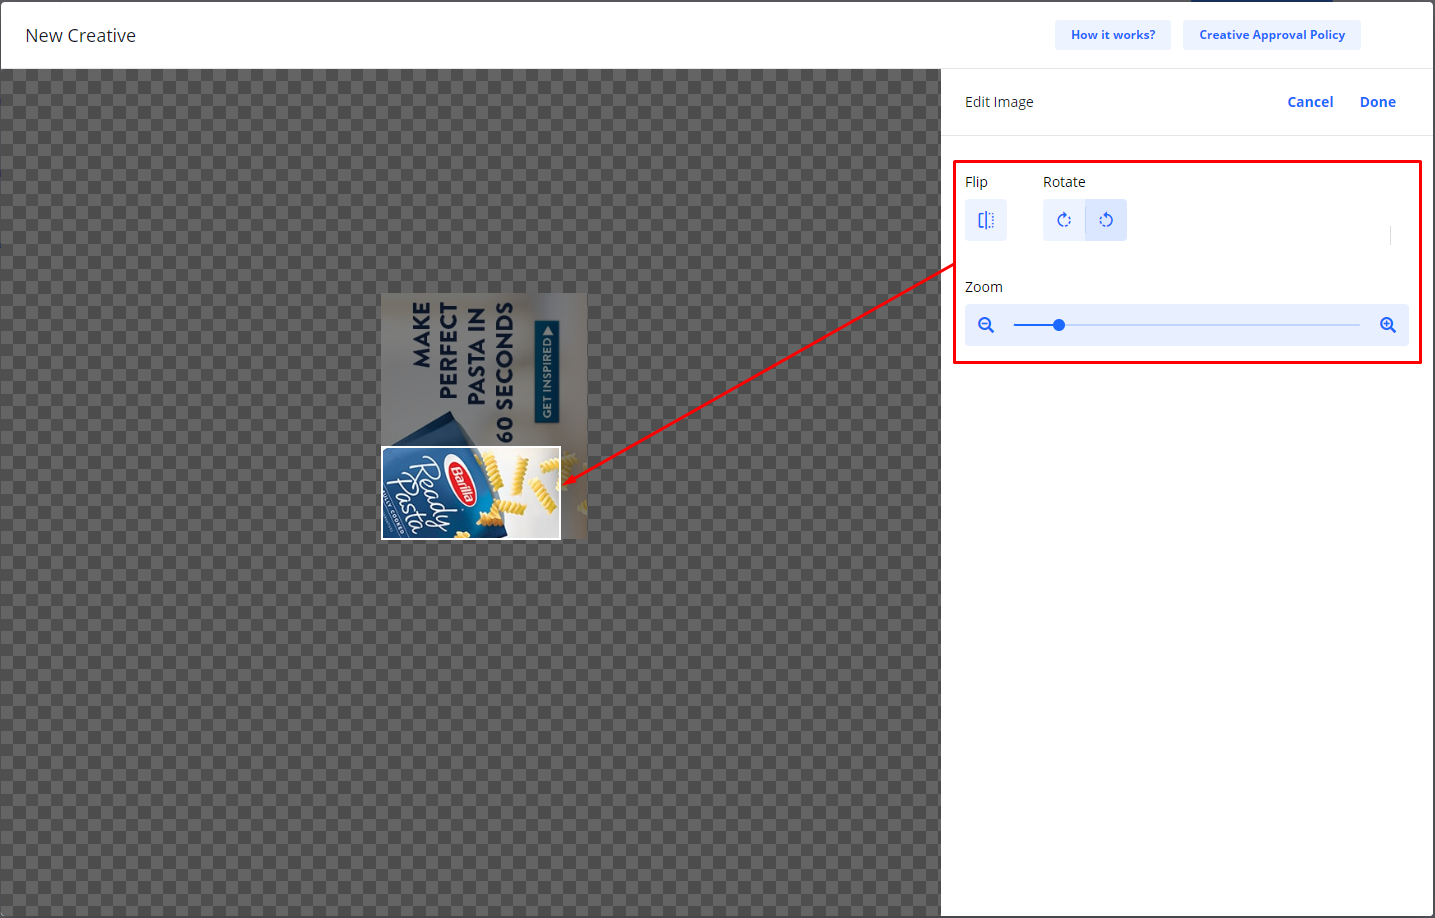
- Creative Name (only you will see this)
- Destination URL (what will happen when your ad is clicked)
- Headline
- Body text
- Call to action text
- Attribution text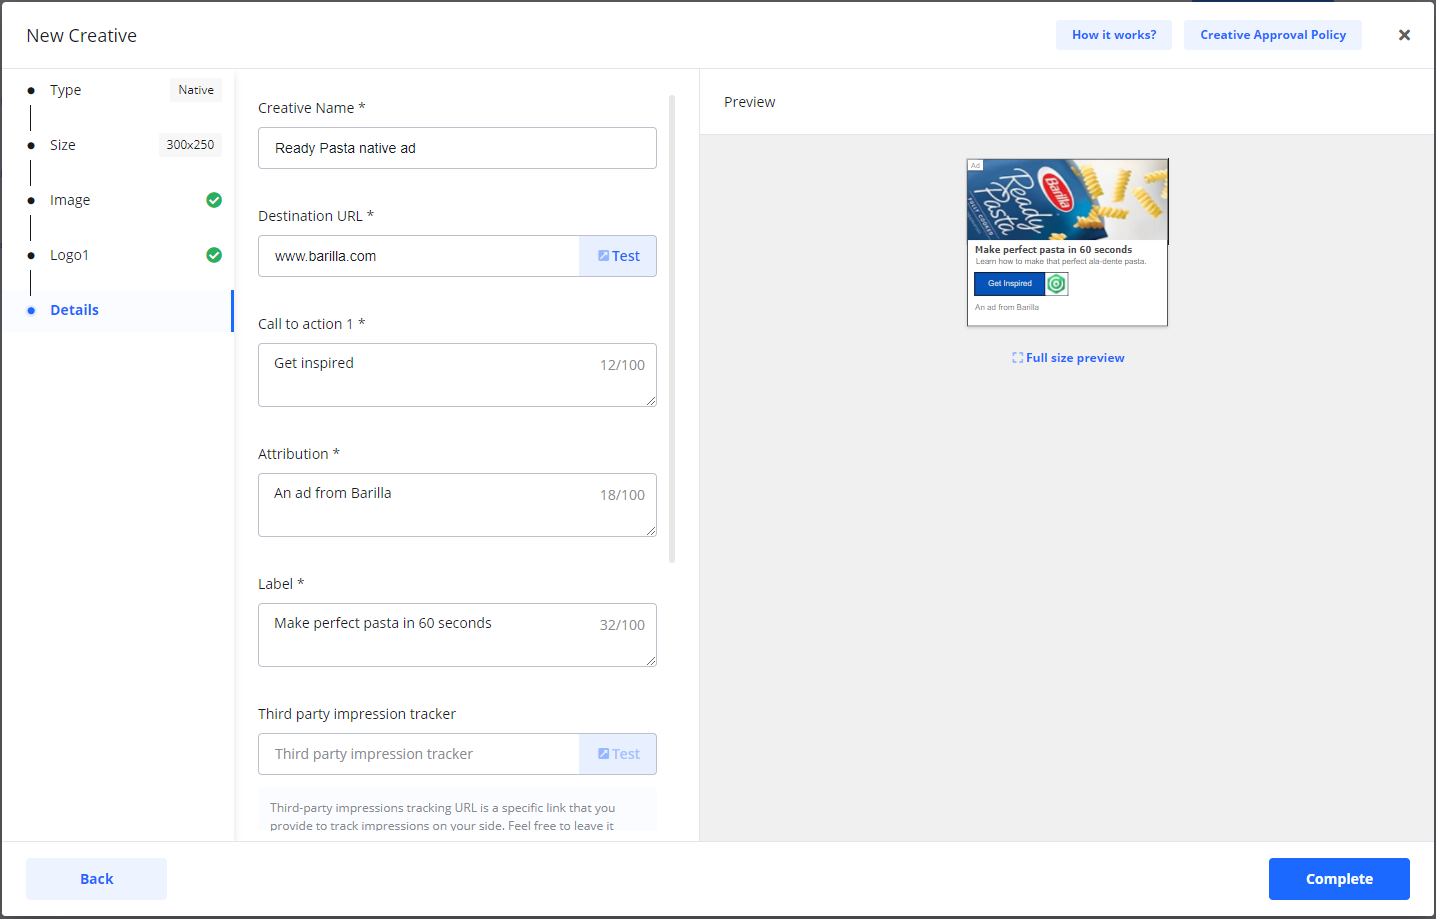

When you check out a campaign, Draft creatives under the campaign will change status to Under Review and is sent for approval.
If you want your creative to be served via a third party provider, you can do so by the option Add a Third Party Script. You add this type of creatives directly from the Wizard or under Campaign details > Creatives. Select + New Creative Select Creative Type > Add a Third Party Script. Select a Format / Size. Click Next. In Details page enter: Select Complete. The new creative is added to your campaign. Creative statuses: If your campaign is checked out by card or set for invoice payment, the status for new creatives will be Under Review. Creatives with this status are automatically sent for approval. If you have not yet checked out the campaign, the status of new creatives will be Draft. Third Party script Creatives
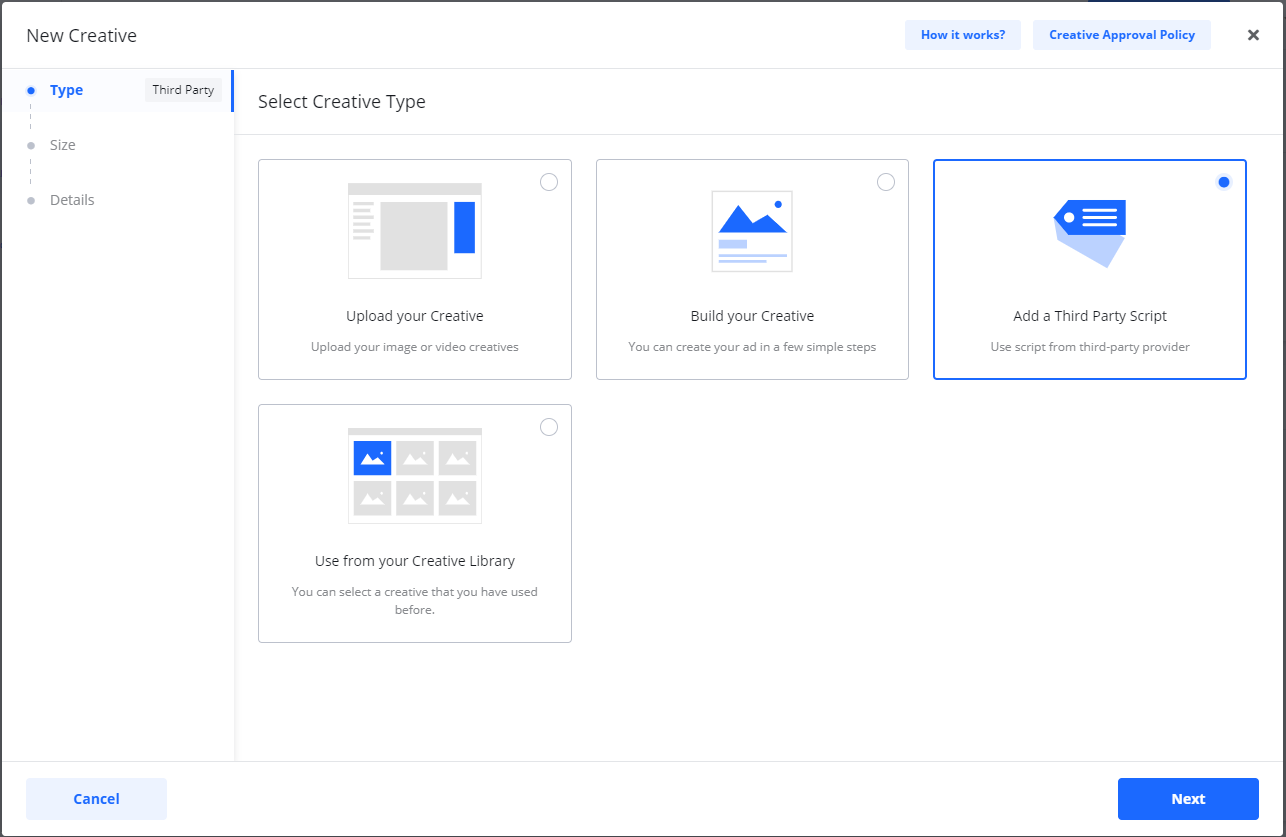
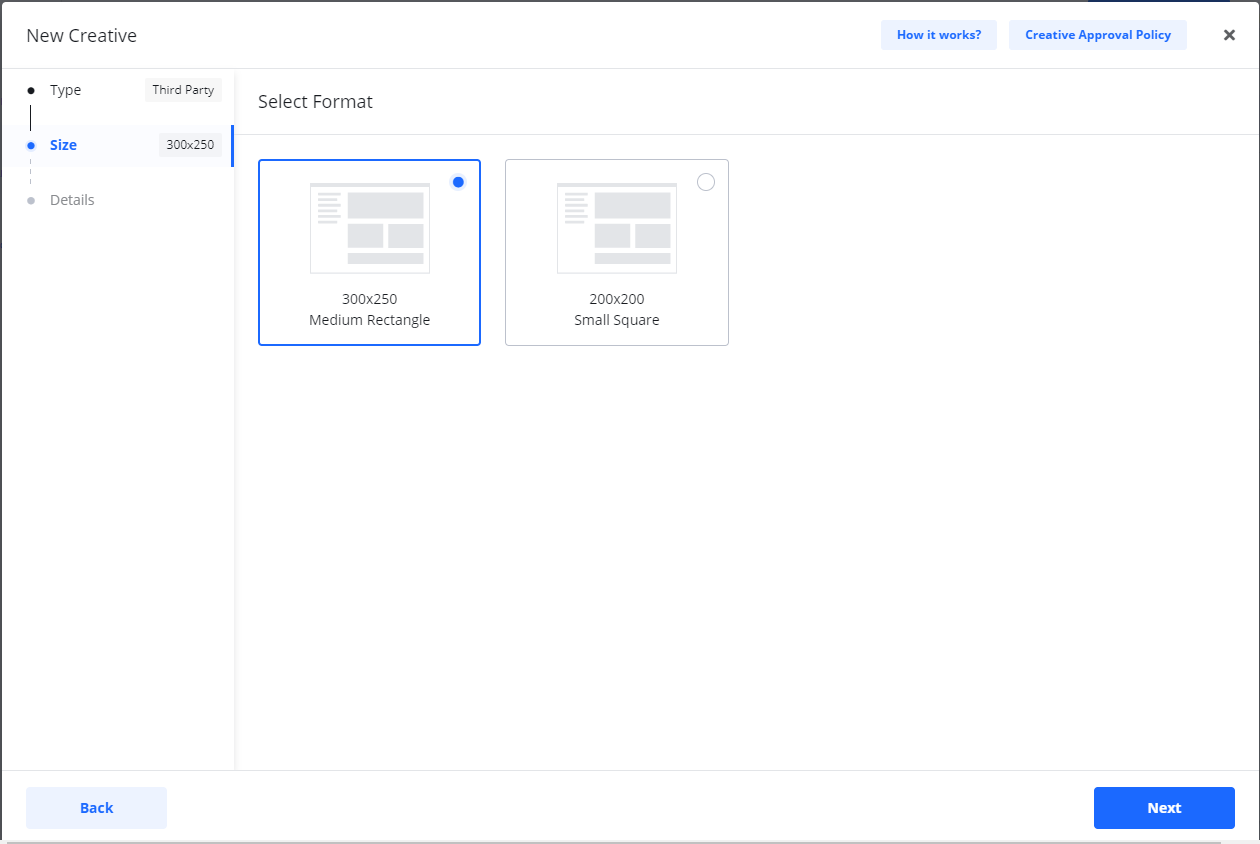
If the Format you are looking for is not available, check the Product step in the Wizard to see which are the available creatives and sizes.
- Creative Name (only you will see this)
- Script
If the ad is already available from the third-party ad-server, you will see it under Preview.

When you check out a campaign, Draft creatives under the campaign will change status to Under Review and is sent for approval.
If you want to use a video in your ad, you can do so by the option Upload Video. As with any other type of creative, you add your video directly from the Wizard or under Campaign details > Creatives. Select + New Creative You can select between Upload your Video Creative and Upload VAST Video Tag. Select Next to select the size of the placement where your video will be shown. Select Next to move forward.. Select Upload to select a video from your computer or or drag & drop a video file directly to the marked area: While uploading you will see a progress message in the Preview section. If the upload is successful you will see your video in the Preview section. Start your video and make sure everything is correct. Details is the last screen in the creative wizard: Here you set: When you are done, select Complete. Your new video creative is shown in the list. For VAST Video Tags, after selecting Size, you only set Creative Name and VAST Tag URL. The rest of the parameters for video, Destination URL, etc. is handled inside the VAST Tag. New video creatives are shown with status DRAFT. When you Checkout and pay, the status of your creatives changes from Draft to Under Review and a notification is sent to the publisher to review and approve your ad. When the publisher starts the approval process, you will see your video status change from Under Review to Processing. After your creative has been reviewed you will get a notification that your video is either Approved or Rejected. If rejected, you will see the reason for rejection. If approved, your video is shown to your audiences. During the time your video is shown, the status is Active and you can see statistics updated daily. In case your video file or VAST Tag does not meet the requirements, you will see a message describing the problem. When this happens, you need to upload a different video file or provide a different VAST Tag.Video Creative
For VAST please see section VAST Video Tag below. 


Then select Next.
- Creative Name (only you will see this)
- Destination URL (when people click your ad, this is where they will be re-directed.
- Tracking Event(s) (optional)
You can set as many tracking events as you like.
For each event you want to track, you set the Third-party tracking URL. 

VAST Video Tag

Video Creative statuses


Video creative error messages

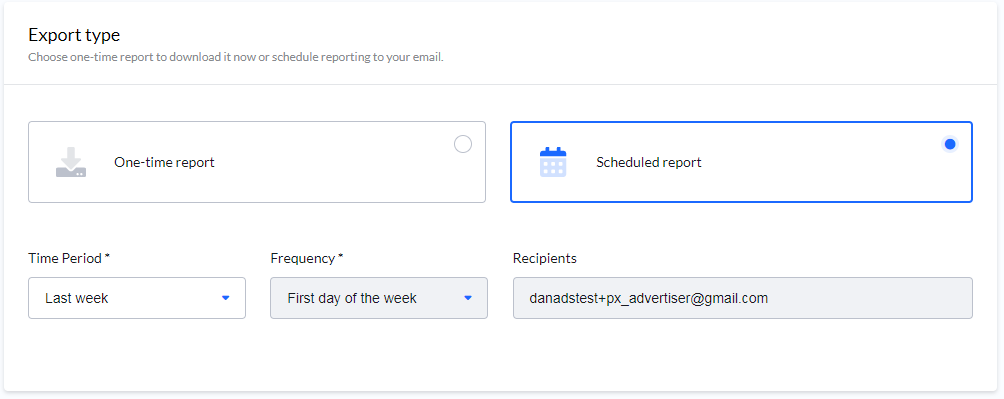
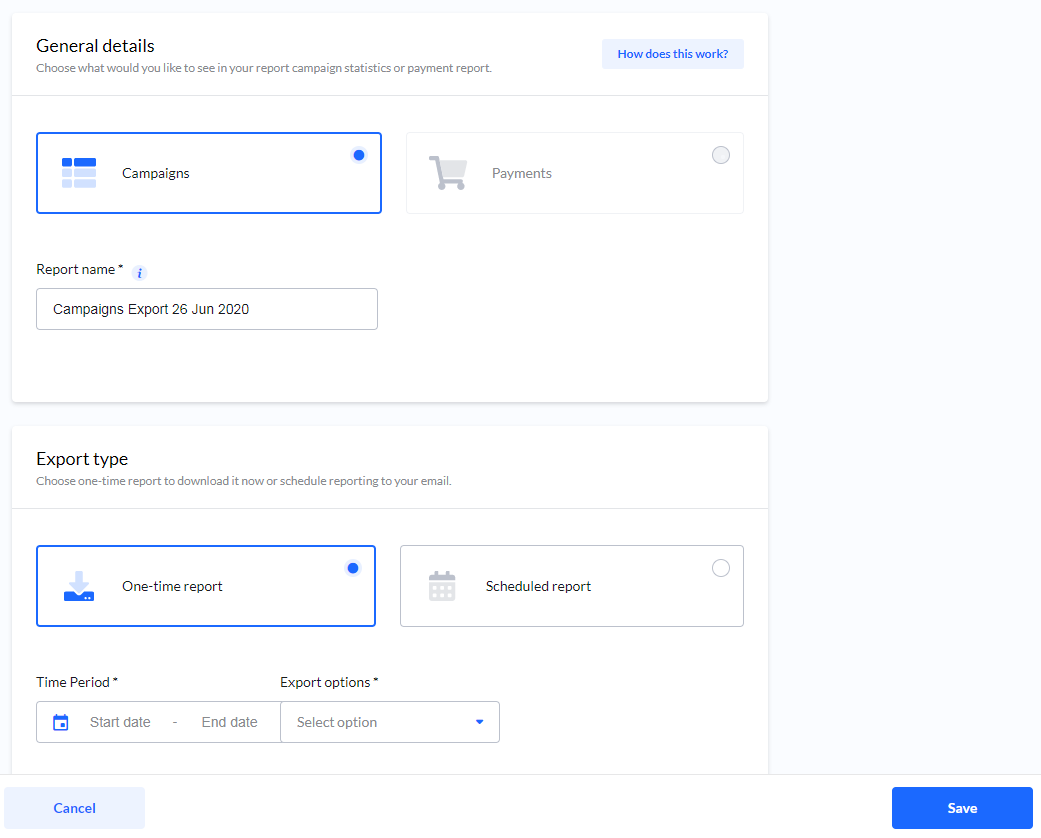
Reports show details and statistics for all your Campaigns and Orders. All reports are exported in Excel format. You reach the report functionality via the Report icon on the Dashboard. Click New Report. Select Campaigns or Orders. Enter a Report name. Select either: One-time report Scheduled report Set Time Period. Select Export options. Click Save. The new report show status GENERATING until it is ready. You can download the report when status is COMPLETED. Select Time Period. Select Frequency. Click Save. Your new scheduled report will regularly be sent to the email address on your account in the Platform.
You decide if you want either a one-time report for download, or as a scheduled report which is sent to your email address regularly. 

Create a report
Note: if you are an Agency, you will also have an option to export Clients.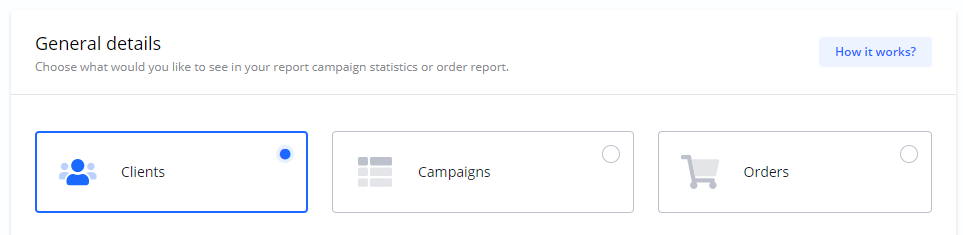
One-time report
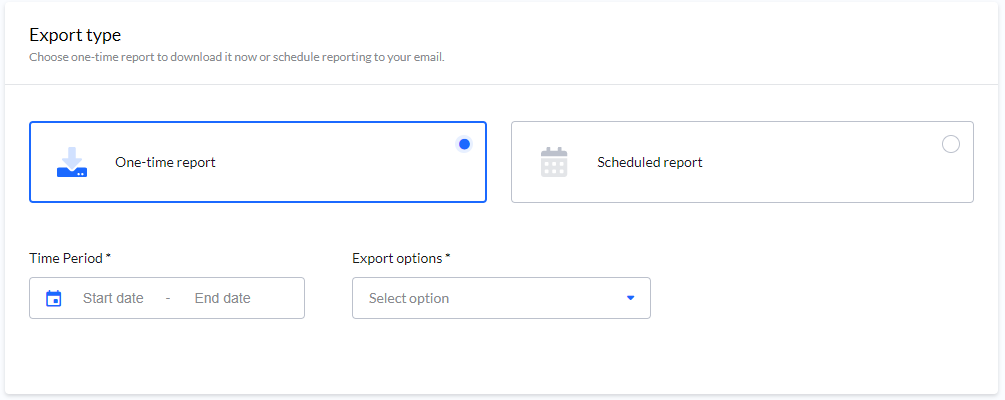
Date period for which you want to export data.
- Direct download - you will be able to download the report directly.
- Send by email - the report will be sent to you as an attachment.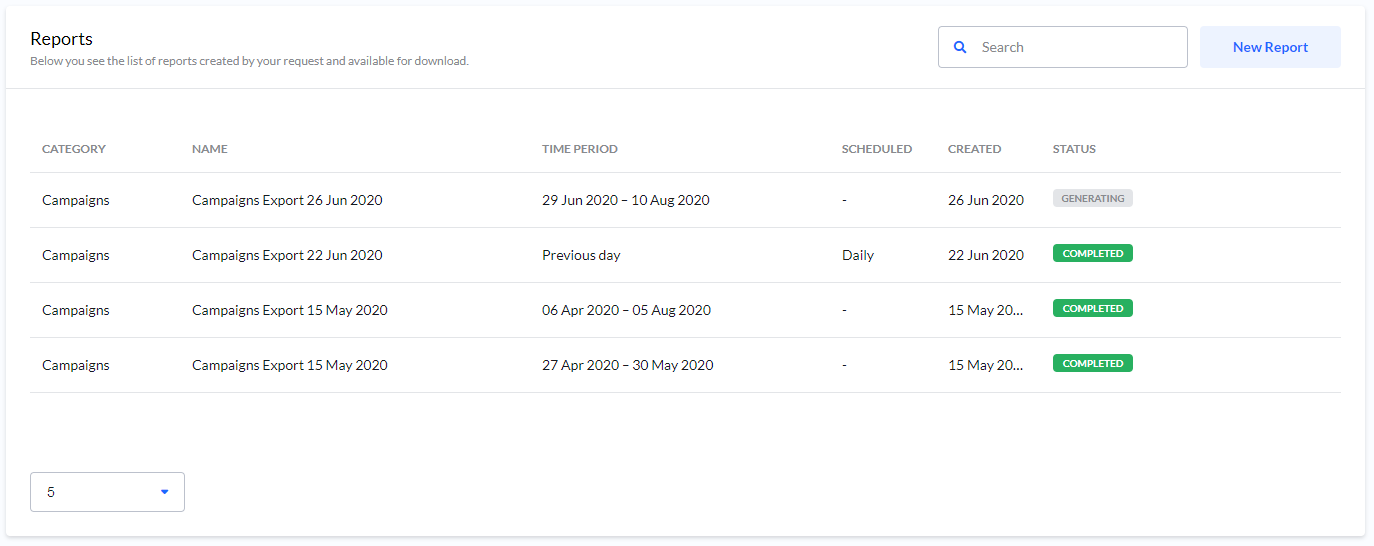

Scheduled report